Extending Django User Model (UserProfile) like a Pro
Sometimes, we have the idea, we know what tools to use, but putting them together to create applications or solve problems becomes a challenge. You’re not alone. Happens to me too.
Django, out of the box, comes with a User Model, which stores user-related info, including but not limited to the email, username, first name and lastname, and passwords. The User Model comes with other fields, that aren’t so useful to a user on our site, like the last login datestamp and groups, though they’re essential for developers.

One of the many requested and asked questions about the User Model is how to extend it. The Django documentation holds how to extend the Django Model. For instance, the Django docs provide this step on how you can extend the user model
from django.contrib.auth.models import User

class Employee(models.Model):
    user = models.OneToOneField(User)
    department = models.CharField(max_length=100)

>>> u = User.objects.get(username='fsmith')
>>> freds_department = u.employee.department
So right from creating the OneToOneField relationship with the User model, the Documentation drops to the python shell of Django. Sweet, and nice. But let’s take it step by step for a better understanding!
So, let’s Extend the Django User Model like a pro
My Approach
This is how I do my extending of the User Model in my projects. I’ve tried the two recommend approaches by Django. Instead of subclassing the AbstractUser model, I use the OneToOneField instead.
Our UserProfile Model
from django.db import models
from django.contrib.auth.models import User
from django.db.models.signals import post_save

class UserProfile(models.Model):
    user = models.OneToOneField(User, related_name='user')
    photo = FileField(verbose_name=_("Profile Picture"),
                      upload_to=upload_to("main.UserProfile.photo", "profiles"),
                      format="Image", max_length=255, null=True, blank=True)
    website = models.URLField(default='', blank=True)
    bio = models.TextField(default='', blank=True)
    phone = models.CharField(max_length=20, blank=True, default='')
    city = models.CharField(max_length=100, default='', blank=True)
    country = models.CharField(max_length=100, default='', blank=True)
    organization = models.CharField(max_length=100, default='', blank=True)
A few notes
- This is a snippet taken from a production application using Mezzanine as CMS, thus the FileField class
- We’re explicitly adding the
blank=Trueanddefault=''on each field we can.blank=Truemeans the generatedform.as_por whatever will allow submission of empty form for the particular field. The default=” means when nothing is submitted during the saving of the Model, no errors will be thrown, because the default=” will step in to put in there an empty string. - The post_save signal will be used soon in a bit to ensure, whenever a User model is created, a corresponding UserProfile is created. In many cases, you will want the ID of the User model to be same as UserProfile.
With our UserProfile model ready, we want to achieve this: Whenever the user requests to edit his/her User profile (the by default User Model from Django), we attach the UserProfile along with it, in order to kill two birds with one stone.
Instead of having separate editing forms for User Model and UserProfile Model, we will only have one edit form for the User.
To do that, we need to pull some strings here and there. Before we do that, since we’re in the models.py file, let’s just touch on the automatically creating a UserProfile object whenever a User object is created.
We’ll use another useful feature of Django signals, which although great, should be used sparingly for really important stuff, like what we’re about to. Here we go.
def create_profile(sender, **kwargs):
    user = kwargs["instance"]
    if kwargs["created"]:
        user_profile = UserProfile(user=user)
        user_profile.save()
post_save.connect(create_profile, sender=User)
For more information on Django signals, see the documentation. But quickly, what the above snippet is doing is that, whenever there’s a post_save (that is, after saving a User Model – that’s specified in the ‘sender=User’ param, run the function, create_profile).
Other signals exist, like pre_save and pre_delete. These signals are priceless as they allow you to run a function or perform a task before or after something happens.
With the above signal, anytime a User Model is created, the post_save() signal is thrown. This signal in the above snippet is told to connect, or ‘do’ the creating of a UserProfile, with the instance of the User Model.
Remember we told our UserProfile Model to accept blank form submissions, and when blank submissions come in, it should just fill the blank with empty strings? If we didn’t do that, then we would need to update our create_profile() function to accommodate the parameters/fields for the UserProfile, like so:
def create_profile(sender, **kwargs):
    user = kwargs["instance"]
    if kwargs["created"]:
        user_profile = UserProfile(user=user, bio='my bio', website='http://khophi.co')
        user_profile.save()
post_save.connect(create_profile, sender=User)
I hope you get the point! However, it doesn’t really make sense to put information into a site user’s biography or firstname etc. Give the user the option to update their profile whenever they want. Give the user the control. 🙂
Next stop is getting a ModelForm ready for the views.py. In your forms.py, get this read:
from django import forms
from django.contrib.auth.models import User

class UserForm(forms.ModelForm):
    class Meta:
        model = User
        fields = ['first_name', 'last_name', 'email']
Sorry but I’m not explaining this. If you don’t happen to understand the above snippet, then you shouldn’t be following this tutorial, but rather be reading the Django Docs.
So with our UserProfileForm ready, let’s get going. Remember, I omitted the ‘username’ field. There might exist such a foolish developer, who would allow their arbitrary users to change their usernames by themselves, and yet use the username field as authentication means. Please, don’t let users change their usernames.
Plus, I’m using the explicit declaration of the fields I want to be shown in the form, and not using the ‘exclude’ Meta option. Remember, Explicit is better than Implicit.
Time for Heavy Lifting
Now it’s time for our views.py. That’s where we heavy lift things. Let’s drop it before we discuss it:
from django.shortcuts import render, HttpResponseRedirect
from django.contrib.auth.decorators import login_required
from django.contrib.auth.models import User
from .models import UserProfile
from .forms import UserForm
from django.forms.models import inlineformset_factory
from django.core.exceptions import PermissionDenied
@login_required() # only logged in users should access this
def edit_user(request, pk):
    # querying the User object with pk from url
    user = User.objects.get(pk=pk)

    # prepopulate UserProfileForm with retrieved user values from above.
    user_form = UserForm(instance=user)

    # The sorcery begins from here, see explanation below
    ProfileInlineFormset = inlineformset_factory(User, UserProfile, fields=('website', 'bio', 'phone', 'city', 'country', 'organization'))
    formset = ProfileInlineFormset(instance=user)

    if request.user.is_authenticated() and request.user.id == user.id:
        if request.method == "POST":
            user_form = UserForm(request.POST, request.FILES, instance=user)
            formset = ProfileInlineFormset(request.POST, request.FILES, instance=user)

            if user_form.is_valid():
                created_user = user_form.save(commit=False)
                formset = ProfileInlineFormset(request.POST, request.FILES, instance=created_user)

                if formset.is_valid():
                    created_user.save()
                    formset.save()
                    return HttpResponseRedirect('/accounts/profile/')

        return render(request, "account/account_update.html", {
            "noodle": pk,
            "noodle_form": user_form,
            "formset": formset,
        })
    else:
        raise PermissionDenied
No joke! Every import there is being used. Take a deep breath. And take your time. Read every line of the above code. Are you done?
My 2 cents on the above:
- We’re using
inlineformset_factory(), a very useful tool, but rarely used, because of how convoluted it appears, and how messed up your life can be, setting it up. But when you get the hang of it, its simple. Inlineformset_factoryis designed to allow you to edit two models related to each other at once, in a single form. There’s another clean workaround to doing the same thing the inlineformset_factory does. I’ll share that in a later article.- Now, refer back to the snippet for the inline comments to understand.
Welcome back. If you haven’t take a quick look at the inlineformset_factory
ProfileInlineFormset = inlineformset_factory(User, UserProfile, fields=('website', 'bio', 'phone', 'city', 'country', 'organization'))
In English, take the User Model, append the UserProfile to it in a single form, whiles you only expose the specified fields under the UserProfile. We have already specified what fields to expose regarding the User Model in forms.py in the UserForm Class.
We’re instantiating the ProfileInlineFormset, so we could use it in the ‘if…else’ block of code that followed.
First, the
if request.user.is_authenticated() and request.user.id == user.id:
is there to check that, from that moment onwards, the actions are done by a logged in users, and the logged in user’s id is the same as the UserProfile id. Yes, the logic is a bit tricky here, but if you remember, that’s why we created a UserProfile object every time a User object is created. In that way, we can be 100% sure that, if a User object has an ID of 10, the corresponding UserProfile will have 10. Therefore, if we want to check if the User is the correct person who has the right to edit a corresponding UserProfile, we only check against their IDs.
In that way, we can be 100% sure that, if a User object has an ID of 10, the corresponding UserProfile will have 10. Therefore, if we want to check if the User is the correct person who has the right to edit a corresponding UserProfile, we only check against their IDs.
[wp_ad_camp_1]
I know what you’re thinking. What if a User object gets created, but the corresponding UserProfile doesn’t, thus the ID’s mismatch? That’ll be a nightmare, but with the above approach, I don’t know how that’ll be possible unless the post_save signal isn’t fired, maybe in an unlikely, 1 in a 5 quintillion possibility that before the post_save() could fire, the server went down, and restarted! In fact, the chance of getting to Andromeda alive will be higher than the above scenario happening!
if request.method == "POST":
            user_form = UserForm(request.POST, request.FILES, instance=user)
            formset = ProfileInlineFormset(request.POST, request.FILES, instance=user)

            if user_form.is_valid():
                created_user = user_form.save(commit=False)
                formset = ProfileInlineFormset(request.POST, request.FILES, instance=created_user)

                if formset.is_valid():
                    created_user.save()
                    formset.save()
                    return HttpResponseRedirect('/accounts/profile/')
Although the form goes out the template as one, there are two forms. Sounds crazy, but sorry, that’s how it is. As such, we need to process both forms independently, one after the other, and that’s exactly what the above snippet does. If the incoming request is a POST, then that block of python kicks in.
We collect the ‘user’ object from request (context), and pass the object into both forms.
If user_form is valid, don’t save it yet! Hold it right there, buddy! Move onto the formset. Validate it. If all is set, then save the user_form and formset.
Redirect to the desired page after all the drama!
That’s it! In all, the snippet will look like this. I have left out all the imports.
#views.py

@login_required
def edit_user(request, pk):
    user = User.objects.get(pk=pk)
    user_form = UserProfileForm(instance=user)

    ProfileInlineFormset = inlineformset_factory(User, UserProfile, fields=('website', 'bio', 'phone', 'city', 'country', 'organization'))
    formset = ProfileInlineFormset(instance=user)

    if request.user.is_authenticated() and request.user.id == user.id:
        if request.method == "POST":
            user_form = UserProfileForm(request.POST, request.FILES, instance=user)
            formset = ProfileInlineFormset(request.POST, request.FILES, instance=user)

            if user_form.is_valid():
                created_user = user_form.save(commit=False)
                formset = ProfileInlineFormset(request.POST, request.FILES, instance=created_user)

                if formset.is_valid():
                    created_user.save()
                    formset.save()
                    return HttpResponseRedirect('/accounts/profile/')

        return render(request, "account/account_update.html", {
            "noodle": pk,
            "noodle_form": user_form,
            "formset": formset,
        })
    else:
        raise PermissionDenied

# forms.py
class UserProfileForm(forms.ModelForm):
    class Meta:
        model = User
        fields = ['first_name', 'last_name', 'email']

#models.py
class UserProfile(models.Model):
    user = models.OneToOneField(User, related_name='user')
    photo = FileField(verbose_name=_("Profile Picture"),
                      upload_to=upload_to("main.UserProfile.photo", "profiles"),
                      format="Image", max_length=255, null=True, blank=True)
    website = models.URLField(default='', blank=True)
    bio = models.TextField(default='', blank=True)
    phone = models.CharField(max_length=20, blank=True, default='')
    city = models.CharField(max_length=100, default='', blank=True)
    country = models.CharField(max_length=100, default='', blank=True)
    organization = models.CharField(max_length=100, default='', blank=True)


def create_profile(sender, **kwargs):
    user = kwargs["instance"]
    if kwargs["created"]:
        user_profile = UserProfile(user=user)
        user_profile.save()
post_save.connect(create_profile, sender=User)
Wrapping Up
I hope you find this article useful. I put everything, including imports in this gist on Github
In your urls.py you might do something like this, in order to edit the edit_user function:
...
url(r'^accounts/update/(?P<pk>[\-\w]+)/$', views.edit_user, name='account_update'),
...
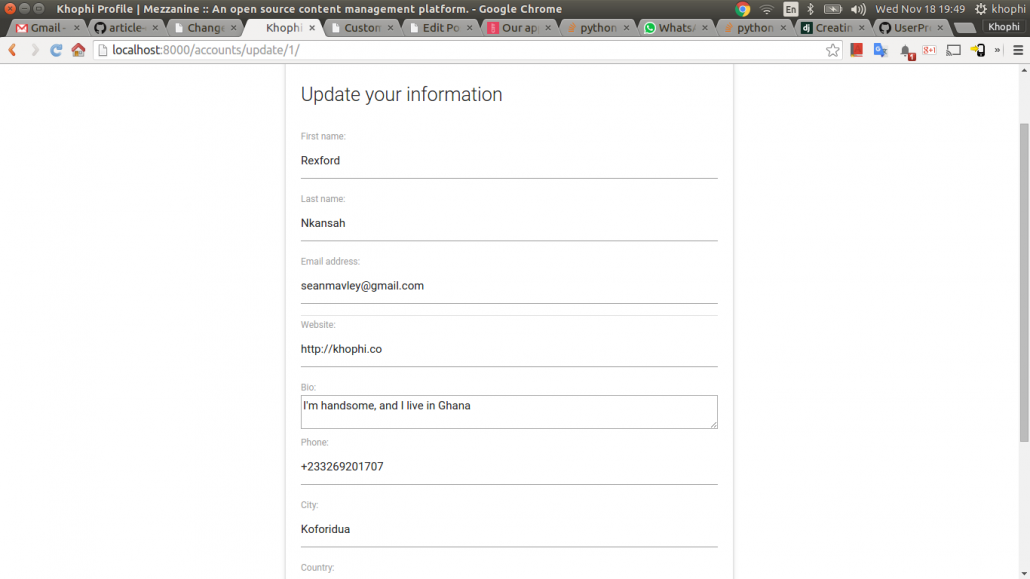
In your templates, then you go like this:
{% load material_form %}
<!-- Material form is just a materialize thing for django forms -->
<div class="col s12 m8 offset-m2">
      <div class="card">
        <div class="card-content">
        <h2 class="flow-text">Update your information</h2>
          <form action="." method="POST" class="padding">
            {% csrf_token %} {{ noodle_form.as_p }}
            <div class="divider"></div>
            {{ formset.management_form }}
                {{ formset.as_p }}
            <button type="submit" class="btn-floating btn-large waves-light waves-effect"><i class="large material-icons">done</i></button>
            <a href="#" onclick="window.history.back(); return false;" title="Cancel" class="btn-floating waves-effect waves-light red"><i class="material-icons">history</i></a>

        </form>
        </div>
    </div>
</div>
Happy Djangoing!

