Updated: Ionic 2 Forms – Getting Started on the Right Foot
Preamble: You probably stumbled on this page after tirelessly searching online for a least working example of forms in Ionic 2. I’ve been in your current shoes, and know how it feels. Ionic 2 is new, and tutorials are thrown here and there, some outdated, others addressing the advanced parts of the form, without tackling what the basics are. I tell you the basics in this, so get ready.
Validations and how to use FormBuilder is discussed in my follow-up article. Many talk about how to setup Ionic 2 Side menu and tabs, so I touched on it.
Update: If you’re using the new Ionic 2 Beta.11 with AngularJS RC4, you’ll find the update to this article here: https://blog.khophi.co/new-changes-ionic-2-forms-examples/
Whenever there’s a new cool kid in town, everyone rushes to catch a glimpse. Some join the party later. Other’s struggle to catch a glimpse or even come close. It is even worse when the cool kid you knew isn’t the one standing there, nor she ain’t wearing what you always knew her to wear.
It is frustrating, but with the right concepts and mentality shift, you are great to adapt to this new kid and fall in love.
Ionic 2 is the new kid in town. Ionic 2 comes with tons of features and does things differently. A typical example is how navigation by default now uses the page-stack-push-and-pop approach and a different way to deal with forms.
In this article, I hope to walk you through how to handle extremely basic forms in Ionic 2. The examples used will probably be the easiest you’ll probably see online at the moment. So, before the codes start hitting left and right, how about we take a second to appreciate how Ionic 2 (Angular 2, for that matter) forms are structured.
New Concepts and Approach
Forms are a crucial aspect of many web application. You’ve heard that line probably a million times. I had to say it again. It is more like how an intro video plays at the beginning of each episode of a series, although you ‘think’ you know the story line. Well, you don’t, so,
Forms are crucial aspect of many web applications. Let that sink in!
Angular 2 (which Ionic 2 uses) having the above mantra at heart, also revised how forms are handled, to ensure Forms are better built, in an easy and fast manner.
Controlsallows us to get access to form input values, individually, or as a groupValidators, well, does validationObserversallow us to provide error messages and feedback to form elements responsively
All the above except Controls were available in Angular 1, and available in Angular 2. However, how it works it kinda different a bit.
I will be touching only on Controls and ControlGroups in this article. Subsequent ones might handle the rest.
Controls – Let’s take Control, Shall we?
A Control represents a single input field – it is the smallest unit of an Angular form.
Control s encapsulate the field’s value, and states such as if it is valid, dirty (changed), or has errors.
The above quote was taken from NG-Book 2. It is a great book, and I’ll recommend you get yourself a copy.
Previously, in Angular 1, one would do something like this in the template to bind the form input values to an object, which would be intercepted in the controller $scope for use, either sent to a service or manipulated and returned.
// typical example of a control in action
<input type="text" ngControl="name" />
Will be showing complete examples in a jiffy below, so hold on a bit as we dive through the ‘controls’ a bit.
ControlGroup
Most forms have more than one field, so we need a way to manage multipleControls. If we wanted to check the validity of our form, it’s cumbersome to iterate over an array of Control s and check each Control for validity.ControlGroups solve this issue by providing a wrapper interface around a collection ofControls.
I think the explanations from ng-book 2 is enough to paint the picture we’re looking at here with Angular 2 forms.
Thus, building Angular 2 forms takes the form of creating Controls within a ControlGroup, then attach metadata and logic
Making actual sense from above.
As usual, if you’re the type that loves to get your hands dirty, whatever you read above is bad, and makes no sense. In fact, you probably didn’t read. I get it. The fun part begins here, and will help you get a better understanding.
Let us for a second, say we have an Ionic Project initialized probably, and have created a page called addtext using the ionic generate page addtext command. As usual, I’ll be leaving comments in the code snippets, so you can follow along in there.
addtext.js
// addtext.js in your pages/addtext/
import { Page } from 'ionic-angular';

@Page({
  templateUrl: 'build/pages/addcategory/addcategory.html',
})

export class AddtextPage {
  static get parameters() {
    return [];
  }

  constructor() {
    // do stuff here
  }

  // this function will be called
  // from template
  onSubmit(formData) {
    // let's log our findings
    console.log('Form submission is ', formData);
  }
}
addtext.html
There’s always an exception to the rule, so lemme add the commentary here instead. Take a look at the addtext.html code snippet. Afterward, let’s discuss
// addtext.html template
<ion-content class="addtrans">
    <ion-list inset>
        <form #formData='ngForm' (ngSubmit)="onSubmit(formData.value)">
            <ion-item>
                <ion-label floating>Name of Category</ion-label>
                <ion-input type="text" ngControl="name"></ion-input>
            </ion-item>
            <button block>
                <ion-icon name="add"></ion-icon>Add</button>
        </form>
    </ion-list>
</ion-content>
First:
<form #formData='ngForm' (ngSubmit)="onSubmit(formData.value)">
Remember the boring concept lessons we took above. Bring them here. We said the building blocks of forms in Angular 2 is the Controls and ControlGroup. In the above snippet, lemme translate that to English.
- Create an
ControlGroupimplicitly calledngFormand bind what it will have to the variable, namely,formData - (ngSubmit) directive comes for free when using
ngForm. So, when the form is submitted, carry theControlsGroupdata values – which in turn means the individualControls, or in other words the values of each input field – into theonSubmit()function.
<ion-input type="text" ngControl="name"></ion-input>
The ngControl on the <ion-input> is to allow the value from the input to be available in the parent ControlGroup object.
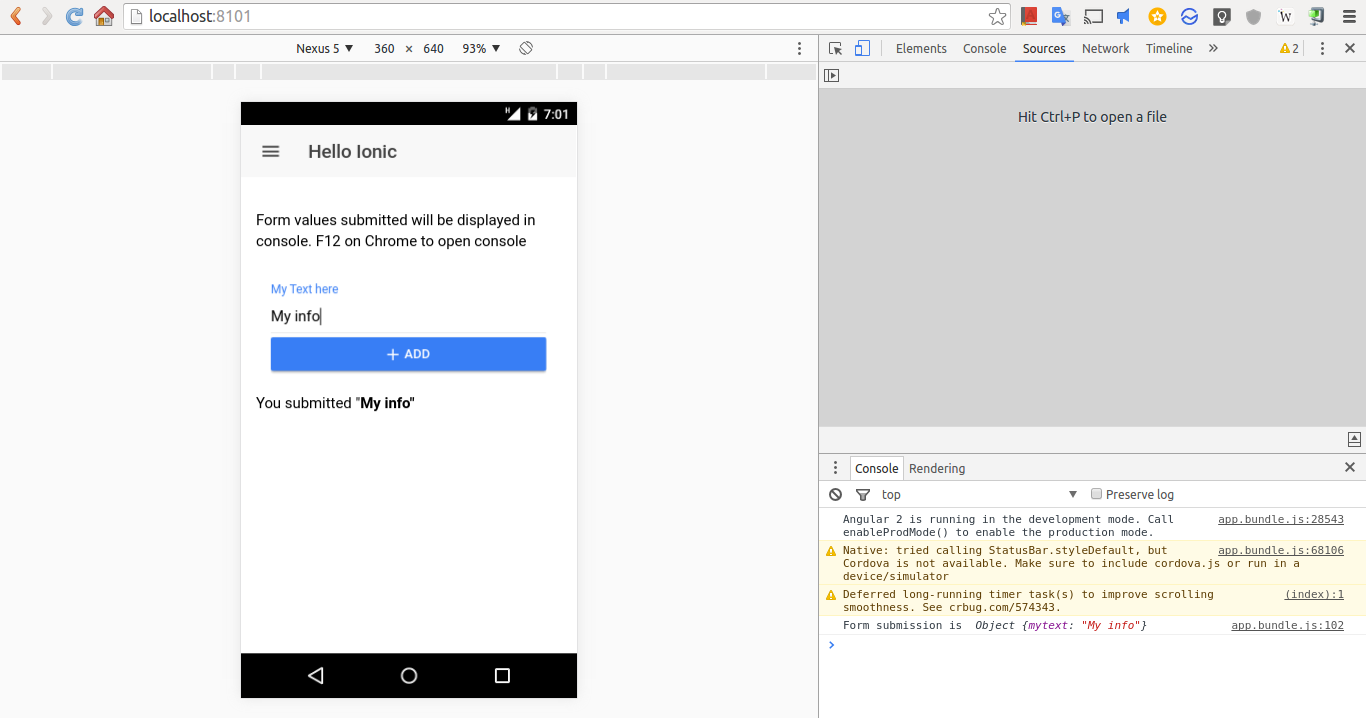
As we saw in the addtext.js file, the onSubmit() function simply logs whatever that comes through from the form to console.
And this is what I get in console:
Form submission is Object {name: "I am submitted"}
I still don’t Understand the Forms
If you still don’t get what is happening here with Angular 2 forms as found in Ionic 2, then I might have to slap you hard with the source code of this article.
First slap goes to your right cheek, and that’s the repo for this simple example above. The next slap to the left cheek is finding a bigger picture of how Ionic 2 forms are handled as seen in the Conference app by the Ionic team, to display some the goodness of the features of Ionic 2. Clone their app to your local PC, and you’ll be amazed the tons of tricks in there, not just forms.
[wp_ad_camp_1]
Link to this article on Github: https://github.com/seanmavley/ionic2-forms
Link to Conference App by Ionic team: https://github.com/driftyco/ionic-conference-app
UPDATE: May 18, 14:05 GMT
And Speaking of Conference App…
I have been going through the code of the conference app from the above repo. One way of building forms that caught my eyes immediately was the use of hybrid, so to speak, of the implicit and explicit way of form building. I do not know if those are the right words for me to use, but …
Let’s see an example to flesh out the point. This is more of an off-the-book add on to the above tutorial, which introduces you to forms in Ionic 2 (Angular 2) on the right foot.
Below are snippets taken from an Ionic project I am working. The form below is a form for editing a Category object. To edit a form, you usually want to pre-populate your form with data from the database. In that way, your users know what they already added, then from there, they can make changes.
One way to get this pre-populating of data is to use FormBuilder, which I have already talked about. Another way is what you’ll see. Consider the snippet below and let’s discuss.
<ion-list inset>
        <form #formData='ngForm'>
            <ion-input type="text" hidden [(ngModel)]="category.id" ngControl="id"></ion-input>
            <ion-item>
                <ion-label floating>Name of Category</ion-label>
                <ion-input type="text" [(ngModel)]="category.name" ngControl="name"></ion-input>
            </ion-item>
            <ion-list radio-group ngControl="type" [(ngModel)]="category.type">
                <ion-list-header>Choose type</ion-list-header>
                <ion-row>
                    <ion-col width-50>
                        <ion-item>
                            <ion-label>Income</ion-label>
                            <ion-radio value="income"></ion-radio>
                        </ion-item>
                    </ion-col>
                    <ion-col width-50>
                        <ion-item>
                            <ion-label>Expense</ion-label>
                            <ion-radio value="expense"></ion-radio>
                        </ion-item>
                    </ion-col>
                </ion-row>
            </ion-list>
            <button block (click)="onSubmit(formData.value)">
                <ion-icon name="update"></ion-icon>Add</button>
        </form>
    </ion-list>
  // in my controller
  constructor(nav, navparams) {
    this.nav = nav;
    this.params = navparams;
    this.category = {
      'id': this.params.get('obj').id,
      'name': this.params.get('obj').name,
      'type': this.params.get('obj').type
    }
  }
First of all, if you don’t know about NavParams, please read about it. What we’re basically doing with the NavParams is using the .get function to capture the parameters passed in from the previous page. That might be something like this:
  // obj is a category object
  // so I can do something like obj.id or obj.name
  editCategory(obj) {
    this.nav.push(EditcategoryPage, {
      'obj': obj
    });
  }
I don’t wanna digress, so let’s get to the form again.
<form #formData='ngForm'>
            <ion-input type="text" hidden [(ngModel)]="category.id" ngControl="id"></ion-input>
The first part is obvious. The second part, same, except we’re using [(ngModel)]. Remember ng-model from Angular 1? This is probably the closest syntax you’ve got, which happens to work in a similar way.
[(ngModel)] is binding the current input field context to the this.category object we created in the constructor. So, in this case, we’re binding to the id field of that this.category object.
Which means, by assigning any value to the id field in the this.category object pushes that value into the template form for our usage. In our case, I decided to capture the obj object passed in from the previous page, using the NavParams then accessing the id field on that.
We win! Our form is prepopulated. You might be wondering, why the ngControl?
Good question! Remember the ngForm creates a kinda ControlGroup for us and the ngControl refers to the individual fields of the form, the basic unit?
When we do submit the form, we submit the ControlGroup, in the object stored in the formData variable. Without applying the ngControl to the form, we will be able to prepopulate the form, but won’t be able to submit. So the this.category is our ticket to form pre-population, and the ngControl is our other way round ticket, to get the form values submitted and committed to the server for processing.
I hope that is clear. You may see the Conference app source code above to learn more about how using the approach above can simplify form building. It is fast and simple.