Tech Leads Programming Class Week 4
In this week’s class, it is about time we prepare our client-side application to talk to our server. Our client – the application in the browser – will make requests to the server, and display responses from the server.
We will be using REST for our means of communication with the server from the client.
Creating Services
Think of a service as a piece of our application code that we can use at many areas of our application. Instead of writing the same piece of code to do something (such as sending user info to login) every now and then, we could just create just one Authentication Service, and then we could import this service in as many files as we want.
This ensures by simply changing one file, we can effect change at all the areas we have imported that service. file. We’ll see it in use soon.
Creating services in Angular is straightforward, with the Angular CLI (Command Line Interface)
We’ll create 3 services:
- Authentication Service (for all our user authentication needs i.e, login, logout)
- Account Service (For user to manage their submitted serial numbers etc)
- Code Service (For user to send, update or delete submitted serial numbers)
To create the services, we use the Angular CLI commands:
ng g service auth --spec false
ng g service code --spec false
ng g service account --spec false
The g stands for ‘generate’, service is the type of file we want generated, and the auth is the name we want give to our service.
The --spec false is simply saying we don’t want any testing specifications. You don’t have to worry about that. You can enter the command without the --spec false and see what happens
Now, create a folder, called providers and put the generated service files into it. It should look like this:
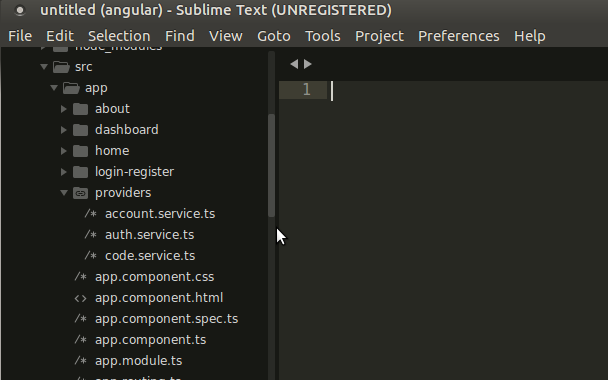
Therefore, we now have all our service files in one folder for easy referencing as we move on.
The complete contents of our auth.service.tsfile is available in this link. I’ll only be running commentary on it here. It is a long file, and adding the contents here won’t be necessary.
auth.service.ts
  getHeaders() {
    let headers = new Headers({
      'Content-Type': 'application/json',
      'Authorization': localStorage.getItem('token')
    });
    return headers;
  }
On line 11, we have the getHeaders() method, which returns a custom header object for us. If a token is available in the localstorage, as in, if the user is logged in, the value of the token is attached to our Authorization field.
  constructor(public http: Http) {  }

  /**
  * Represents new user registration.
  * @param {string} fullName Full Name
  * @param {string} email Email Address
  * @param {string} password User password
  * @param {string} username Username
  * @returns {Observable} An HTTP Response Promise object.
  */
  register(fullName: string, email: string, password: string, username: string, captcha: string) {
    const params = {
      fullName: fullName,
      email: email,
      password: password,
      username: username,
      captcha: captcha
    };

    return this.http.post(AppSettings.API_ENDPOINT + '/auth/register', JSON.stringify(params), {headers: this.getHeaders()})
      .map((res) => {
        console.log(res.json());
        return res;
      });
  }
Starting on line 21, as our AuthenticationService class is instantiated, we make the Httpclass available for use. It is the Http we’ll be using to send and receive requests from the server.
The
/** ... */part is simply for JSDocs. Code documentation. Not mandatory, but is useful. Whenever you’re trying to use theregister()function of theAuthenticationService, depending on your code editor, it might use the information in the/** ... */to guide you.
Our register() function takes 5 parameters.
We make a params object containing the parameters from the register()and pass it to the http.post() method, which sends the data to the server and waits for a response.
return this.http.post(AppSettings.API_ENDPOINT + '/auth/register', JSON.stringify(params), {headers: this.getHeaders()})
      .map((res) => {
        console.log(res.json());
        return res;
      });
You see we doing return. Simply saying, the register() function should return an RxJS Observable, which we would then subscribe to. Therefore, until we subscribe to the register() function, the request to the server won’t happen.
The http.postmethod allows a few parameters on itself. The first is the link where we want to post to. In the above instance, it’ll become http://localhost:3021/auth/register. The AppSettings.API_ENDPOINT is a constant, coming from the contants.tsfile within our src/app/providers/folder.
We, therefore, stringify, converting our params object into a JSON string for sending.
Then, we attach our custom headers, which is calling the getHeaders()function, which simply returns an Http Header object containing a Content-Type and Authorization fields.
Whatever response we get from the request, we return everything, in this case, namely the resobject.
The other function follows a similar pattern.
Lemme just touch on briefly the login() function
    return this.http.post(AppSettings.API_ENDPOINT + '/auth/login', JSON.stringify(params), {headers: this.getHeaders()})
      .map((res) => {
        if(res.json().state) {
          localStorage.setItem('token', res.json().token);
          localStorage.setItem('currentUser', JSON.stringify(res.json().user));
          const time_to_login = Date.now() + 604800000; // one week
          localStorage.setItem('timer', JSON.stringify(time_to_login));
          this.loggedIn = true;
        }
        return res;
      });
localStorage provides an interface for us to quickly store and retrieve stuff from the storage in a browser. Every browser has an allocated storage space for websites. We can take advantage of that via the localStorage API.
So when a login is successful, a few details is sent back, such as the token and user. We store this in the browser.
It is this token that we retrieve and attach to the header object when we want to make requests. If the token isn’t available, the Authorization field would just be empty.
localStorage.setItem('name_of_item', 'actual item to store').
There’s a little if { } block of code. We want the setting stuff into the local storage to happen ONLY when login was successful. The check for a login success is done by looking at the statefield of the returned response object. If state is true, voila. Otherwise, just send the res object to the login component, and it’ll handle the rest.
Don’t worry, all shall be seen in action pretty soon.
Read through the code, and see if it all makes sense. I mean check the other parts of the code of the auth.service.ts. Fortunately there is a bit of documentation and explanation of what each function does. Just be familiar with the code, and let’s move on.
Login Logic
The code below goes into the src/app/login-register/login-register.component.ts file:
import { Component, OnInit } from '@angular/core';
import { ActivatedRoute, Router } from '@angular/router';
import { AuthenticationService } from '../providers/auth.service';
import { ToastrService } from 'ngx-toastr';
import { Title, Meta } from '@angular/platform-browser';

@Component({
  selector: 'app-login-register',
  templateUrl: './login-register.component.html',
})
export class LoginRegisterComponent implements OnInit {

  continue: string;
  busy: boolean;
  registered: boolean;

  email_username: string;
  password: string;

  captcha_response: string;

  constructor(
    private route: ActivatedRoute,
    private router: Router,
    private auth: AuthenticationService,
    private toastr: ToastrService,
    private meta: Meta,
    private pageTitle: Title) { }

  ngOnInit() {

    if(this.auth.isLoggedIn()) {
      this.router.navigate(['/home']);
    }

    this.continue = this.route.snapshot.queryParams['continue'] || '/';

    this.pageTitle.setTitle('Authentication');
    this.meta.updateTag({ 'property': 'og:title', 'content': 'Authentication' })
  }

  login(formData) {
    if (formData.value.email_username && formData.value.password) {
      // console.log(formData.value);
      this.busy = true;
      this.auth.login(formData.value.email_username, formData.value.password)
        .subscribe((res) => {
          this.busy = false;
          if (res.json().state) {
            if(!res.json().email_verified) {
              this.toastr.info(res.json().msg);
              this.auth.logout();
              this.router.navigate(['/auth/not-verified']);
            } else {
              this.router.navigate([this.continue]);
            }
          } else {
            console.log('this was run');
            this.toastr.info(res.json().msg);
            this.auth.logout();
          }
        }, error => {
          this.busy = false;
          // console.log(error.json());
          if (error.json().msg) {
            // console.log(error.json().msg);
            this.toastr.error(error.json().msg);
          } else {
            // console.log('Could not make the request. Please try again.');
            this.toastr.error('Could not make the request. Please try again.');
          }
        });
      } else {
        this.toastr.error('Please fill the form to completion.');
      }
  }

  resolved(captchaResponse: string) {
    // console.log(`Resolved captcha with response ${captchaResponse}:`);
    this.captcha_response = captchaResponse;
  }

  register(formData) {
    this.busy = true;
    // console.log(formData.value);
    this.auth.register(
      formData.value.fullName,
      formData.value.email,
      formData.value.password,
      formData.value.username,
      this.captcha_response)
      .subscribe(res => {
        this.busy = false;
        // console.log(res.json());
        if (res.json().state) {
          this.registered = true;
          // console.log(res.json().msg);
          this.toastr.success('Registration Successful. Follow the instructions in your email to proceed');
        } else {
          // console.log('Try again. Error occured');
          this.toastr.error('Try again. Error occured', res.json().msg);
        }
      }, err => {
        this.busy = false;
        // console.log(err.json().msg);
        if (err.json().msg) {
          // console.log(err.json().msg);
          this.toastr.error(err.json().msg, 'Something is wrong', { timeOut: 15000 });
        } else {
          // console.log('Could not make the request. Please try again.');
          this.toastr.error('Could not make the request. Please try again.');
        }
      });
  }
}
I know what you might be thinking. That seems like a lot of code. In fact, it kinda, because we’re trying to give a useful experience to the user trying to log in or sign up/register.
import { ToastrService } from 'ngx-toastr';
Because of the above import, we need to do a few changes to our application.
ngx-toastris a nice Angular package which allows us to show toasts (notifications) in our application.
Read what toasts are meant for here: https://material.io/guidelines/components/snackbars-toasts.html
Here are the changes you need to do
First, install ngx-toastr. In the command line of your project root, enter npm install --save ngx-toastr @angular/animations
Add ngx-toastr CSS file to your Angular CLI project. Find the .angular-cli.json in the Menpha/project folder.
Update the styles: [ ] part to look like this:
      "styles": [
        "../node_modules/bootstrap/dist/css/bootstrap.min.css",
        "../node_modules/ngx-toastr/toastr.css",
        "styles.css"
      ],
Next, import both the ngx-toastr and @angular/animations in your AppModule
Your AppModule.ts file should end up looking like this:
import { BrowserModule } from '@angular/platform-browser';
import { NgModule } from '@angular/core';
// Modules
import { BrowserAnimationsModule } from '@angular/platform-browser/animations';
import { ToastrModule } from 'ngx-toastr';
// Component Imports
import { AppComponent } from './app.component';
import { HomeComponent } from './home/home.component';
import { AboutComponent } from './about/about.component';
import { DashboardComponent } from './dashboard/dashboard.component';
import { LoginRegisterComponent } from './login-register/login-register.component';

import { AppRouting } from './app.routing';

@NgModule({
  declarations: [
    AppComponent,
    HomeComponent,
    AboutComponent,
    DashboardComponent,
    LoginRegisterComponent
  ],
  imports: [
    BrowserModule,
    BrowserAnimationsModule,
    ToastrModule.forRoot(),
    AppRouting
  ],
  providers: [],
  bootstrap: [AppComponent]
})
export class AppModule { }
If you have been running ng serve all this time, you’ll notice there are no more errors in the console.
There’s gonna be some more errors, so hold on tight. We’ll fix them all though. Don’t worry.
Here’s our login-register.component.html file. Update yours to have the contents below.
<div class="container mt-5">
  <div class="row">
    <div class="mx-auto mb-3">
      <h3>MenPha</h3>
    </div>
  </div>
  <div class="row align-items-center">
    <div class="col-sm-10 col-md-8 col-lg-6 mx-auto">
      <ul class="nav nav-tabs" id="myTab" role="tablist">
        <li class="nav-item">
          <a class="nav-link active" id="login-tab" data-toggle="tab" href="#login" role="tab" aria-controls="login" aria-expanded="true">Login</a>
        </li>
        <li class="nav-item">
          <a class="nav-link" id="register-tab" data-toggle="tab" href="#register" role="tab" aria-controls="register">Register</a>
        </li>
      </ul>
      <div class="tab-content" id="myTabContent">
        <div class="tab-pane fade show active" id="login" role="tabpanel" aria-labelledby="login-tab">
          <form #formData='ngForm' (ngSubmit)="login(formData)" class="mt-3">
            <div class="form-group">
              <label for="email_username">Email or Username</label>
              <input type="email" class="form-control" name="email_username" id="email_username" autofocus autocomplete required [(ngModel)]="email_username" aria-describedby="emailOrUsernameHelp" placeholder="Enter email or username">
              <small id="emailOrUsernameHelp" class="form-text text-muted">Either your username or email address on file</small>
            </div>
            <div class="form-group">
              <label for="password_reg">Password</label>
              <input type="password" class="form-control" name="password" id="password_reg" [(ngModel)]="password" placeholder="Password" required autocomplete>
            </div>
            <button type="submit" class="btn btn-primary" role="button" [disabled]="busy || !formData.valid"><span *ngIf="busy">Logging in...</span><span *ngIf="!busy">Login</span></button>
            <a [routerLink]="['/auth/forgot']" class="float-right">Forgot?</a>
          </form>
        </div>
        <div class="tab-pane fade" id="register" role="tabpanel" aria-labelledby="register-tab">
          <div *ngIf="registered" class="mt-4">
            <p class="lead" *ngIf="registered">
              Thank you for joining KhoPhi. Check your email address for an email from us.
            </p>
            <p>The email will be from KhoPhi, and in it, you will be asked to verify your email. Follow instructions there in to proceed.</p>
            <a [routerLink]="['/']" class="btn btn-outline-primary">Go Home</a>
          </div>
          <form #RegisterData='ngForm' (ngSubmit)="register(RegisterData)" class="mt-3" *ngIf="!registered">
            <div class="form-group">
              <label for="fullName">Full Name</label>
              <input type="text" name="fullName" [(ngModel)]="fullName" class="form-control" id="fullName" aria-describedby="fullName" placeholder="Enter Full Name"  minlength="5" required autofocus autocomplete>
              <small id="fullName" class="form-text text-muted">You'll be called this name throughout KhoPhi</small>
            </div>
            <div class="form-group">
              <label for="email">Email</label>
              <input type="email" class="form-control" name="email" [(ngModel)]="email" id="email" aria-describedby="email" placeholder="Enter email" required autocomplete>
              <small id="email" class="form-text text-muted">Heck! We never share this detail with anyone. <a [routerLink]="['/privacy-terms']" target="new">Privacy Policy</a></small>
            </div>
            <div class="form-group">
              <label for="username">Username</label>
              <input type="username" class="form-control" name="username" [(ngModel)]="username" id="username" aria-describedby="username" placeholder="Enter username" required minlength="3" autocomplete>
              <small id="username" class="form-text text-muted">Minimum 3 characters. This will uniquely identify you throughout KhoPhi</small>
            </div>
            <div class="form-group">
              <label for="password_login">Password</label>
              <input type="password" class="form-control" id="password_login" [(ngModel)]="password" name="password" placeholder="Password" aria-describedby="password" required autocomplete>
              <small id="password" class="form-text text-muted">Length should be at least 6 characters. We won't force you though.</small>
            </div>
            <div class="form-group">
              <re-captcha (resolved)="resolved($event)" siteKey="6LcuIjwUAAAAAKrWVeWPz_1Vhn3aeJkCLhWLuN0l"></re-captcha>
            </div>
            <button type="submit" class="btn btn-primary mb-5" role="button" [disabled]="busy || !RegisterData.valid"><span *ngIf="busy">Hold on a sec...</span><span *ngIf="!busy">Register</span></button>
          </form>
        </div>
      </div>
    </div>
  </div>
</div>
Now, errors, errors everywhere

Let’s fix them one by one.
First, add this import to your app.module.ts file:
import { FormsModule } from '@angular/forms';
Then add the FormsModule to your importsproperty. You should end up with this:
  imports: [
    BrowserModule,
    FormsModule, // <----- We added this
    BrowserAnimationsModule,
    ToastrModule.forRoot(),
    AppRouting
  ],
There is an error about recaptcha. We use recaptcha to do the ‘I’m not a robot’ verification thing.
Install the nifty angular package for that via npm install --save ng-recaptcha
Import, then, in the AppModule like this: import { RecaptchaModule } from 'ng-recaptcha';
And then add to the imports [...] property like so:
  imports: [
    BrowserModule,
    FormsModule,
    RecaptchaModule.forRoot(), // <---- Like this
    BrowserAnimationsModule,
    ToastrModule.forRoot(),
    AppRouting
  ],
All the errors should be gone by now.
Take a deep breath, and congratulations.
So let’s move on to…
Was just kidding. We’re done for today.
What we’ve been able to achieve so far in this lesson are all available on Github at this link:
https://github.com/seanmavley/techleadsclass/tree/Authentication
Conclusion
That’s all we need to log in and register users. Pretty straightforward. I won’t say it is easy, but it CAN be easy. Take your time, and go through the lines. There’s NO magic happening anywhere. And fortunately, the code is like English, that by simply reading, you could understand what is being said or done.
Will see you in the next one, as we setup our server for handling the login from our client. It’ll be fun.