The purpose of this document is two-fold: To document the steps I took in getting a RADIUS Server up and running in connection with a DD-WRT supported Router in creating a Captive Portal WiFi HotSpot. Secondly, to serve as a reference point for individuals wanting to go the path I took.
I struggled some 14 days to figure out how to get things working. Very faint, incomplete, vague and outdated articles scatter the internet. This, I hope to make my life easier the next time I wish to go on a similar journey, but also help newbies to the RADIUS implementation get up and running quick.
Take your time, and patiently read through the entire article. I’m sure all your questions are answered in here. All of them! Otherwise, ask them in the comments below, and I’ll try to answer them to the best of my little understanding.
Table of Contents
- The Need
- Mr. Right Router
- Dr DD-WRT
- RADIUS Server
- DaloRadius
- Restarting Spree
- Add NAS Client
- TroubleShooting
- Conclusion
Finding the right information in late 2016 was hard to come by. This article comprises of weeks of reading and research from countless scattered bits and pieces of resources online relating to deploying a RADIUS Server and putting it to use.
CAUTION: Be very patient with the configurations, especially after setting up the Chillispot on your DD-WRT. Give the router, at least 5 minutes after the configurations. This will allow the Router to adjust fully to the new settings.
Immediately testing the setting just after reboot might not work and will throw you off as the settings not working, although you were/are on the right path.
This is the scenario this article hopes to help me accomplish (as a guide) and teach you.
You want to create a simple WiFi hotspot service for a nearby bar. You’re not wealthy enough to hire a specialist nor buy the best industry grade devices, which probably comes with simple wizard steps.
In a nutshell, here’s the flow: users would connect to an open WiFi network (your HotSpot WiFi). However, without authenticating, users won’t be able to access the internet. Users would authenticate with a
usernameandpasswordcredential, or depending on your needs, they would just simply login with their Facebook or Google account.Users will be asked to purchase the credentials to authenticate, if that’s the approach you take. The credentials will be provided at the Bar and or via a nearby local shop.
A credential will be tailored to how long a user can connect and or how much data can be used.
Although the above scenario, in English, sounds pretty straightforward and simple, a lot of moving parts are involved.
Thus, in this article, I hope to tackle all of them, why I chose what I chose, mistakes I made (and what I would have done differently), and any tips to help anyone on a similar journey would need to make life easier.
As we move along, you’ll come to an understanding of these technologies, and how they come together to help achieve the overall goal of the above scenario.
- Routers (Access Points), also know as a Network Access Server (NAS)
- A RADIUS Server – Will be using the Open Source implementation, namely, Freeradius
- DD-WRT Firmware (which comes with a Chillispot feature, needed for Captive Portal)
- DaloRadius (our Freeradius Web UI Management, with Hotspotlogin)
The Need
I wanted to offer internet access to people making use of a nearby Bar. Instead of password-protecting the router’s connection, the upfront access to the router should be open.
However, after connecting to the router, a user won’t be able to make use of the internet, except only after authenticating.
The authentication could simply be pressing a button, logging in with their Facebook/Google accounts to proceed or entering a username/password combination provided by the service provider, in this case, me!
I began by looking for the right router.
This Article will be updated as and when a better understanding of the technologies involved are gained. Do check back for updates
The Mr. Right Router
The term for such a feature is commonly called ‘Captive Portal’, of which I simply understand as a term coined to reflect what actually happens with such a functionality.
Access Point Router
It is a portal designed to offer restrictions of use, ‘Cap’, of the network. With a myriad of options, wielding control over your WiFi network isn’t far fetched with a Captive Portal installed.
This device is also referred to as a Network Access Server (NAS). Do not confuse this with a Network Attached Storage (also NAS). Both are two different things serving two different functions, except they both happen to have same abbreviation.
Not all Routers/Access Points Firmware come with the Captive Portal feature or even come with supporting hardware.
The Linksys e1200 Router I purchased, for instance, doesn’t come with a Captive Portal supporting firmware out of the box. To get it working for me the way I want as described above, I had to install the DD-WRT Firmware, as a replacement to the default firmware the Router ships with.
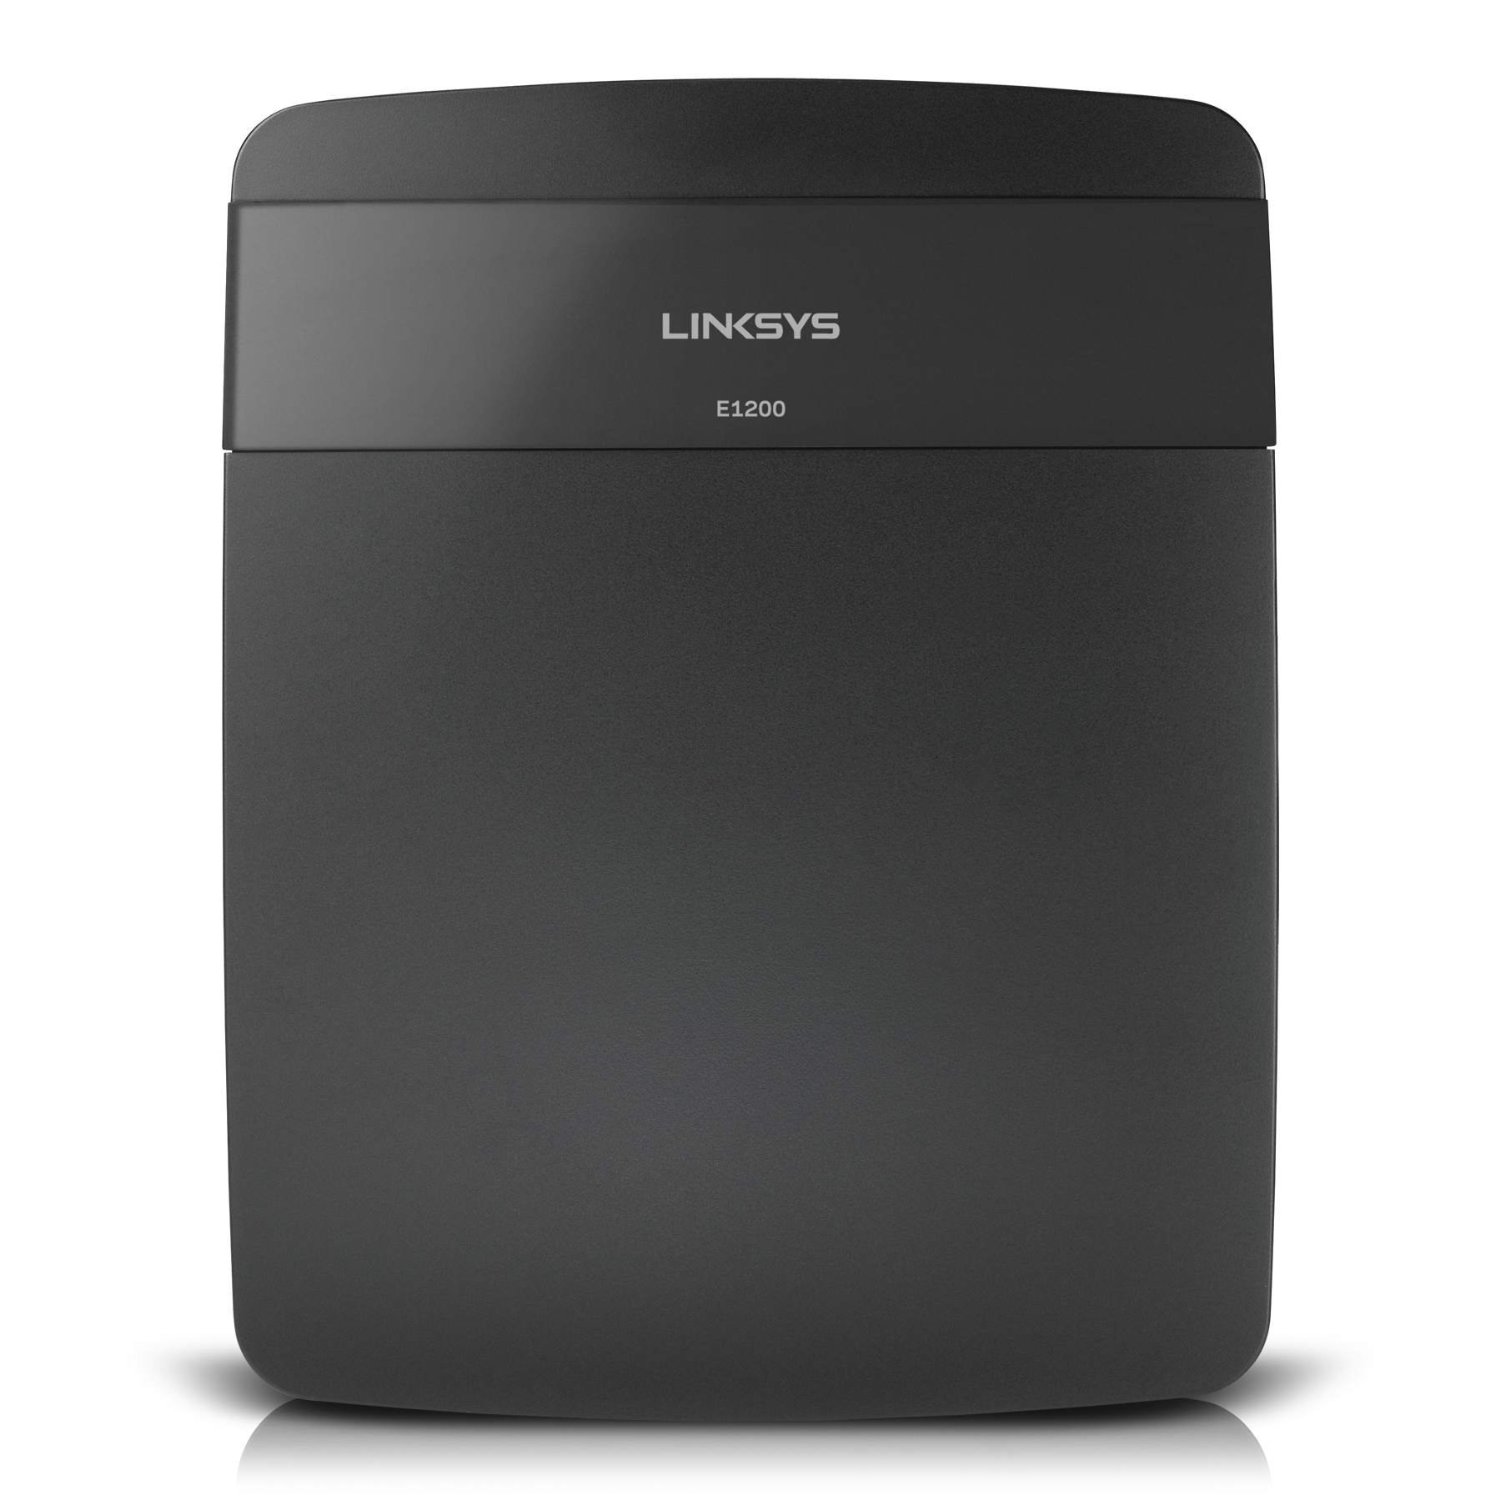
As I went through a list of Routers at a computer shop, I looked for ones with the support for installing a DD-WRT firmware on it. Many Linksys Routers are happily supported by the DD-WRT Firmware. However, be sure to check before picking up your next router, at least if you’re looking to use DD-WRT with a HotSpot support.
Find a long list of DD-WRT Supported devices. Let this list guide you in which device you purchase.
Our Router would serve as the Access Point, which would gate-keep the network, ensuring only those with the right conditions are allowed access.
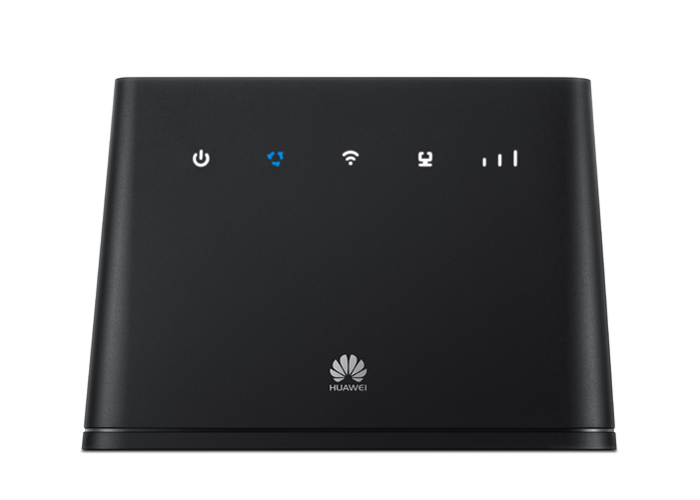
Router Modem
Our Access Point Router above isn’t what will get us the internet connection. Directly connecting to the Internet Service Provider is the Modem Router.
I picked up the MTN-branded Huawei B310s-22 Router. This device supports 4G GSM, however, comes locked. At the time of writing this article, the device is still locked and attempts to unlock it has failed.
If you aren’t or won’t be comfortable with a locked Router modem specific to a network provider, you can find many other alternatives online. In all your search, be sure to get a one that supports LAN cable, as it’ll be needed to plug in the Access Point Router into for access to the internet.
If you can as much as possible avoid the B310s-22 MTN-branded Huawei Router, do! I regret getting this piece of brick, considering how difficult, if not impossible it is to unlock. Just saying!
Our Router modem connects us directly to our network provider, in this case, say MTN.
The internet access is then fed into the Access Point from which all other devices, primarily, Wireless devices i.e phones, tablet, laptops, etc, connect.
Although the Router Modem comes with both LAN and a Wireless (Access Point) feature, we’ll be making use primarily of the LAN connection, and can eventually turn off the Wireless broadcast on the Router modem.
Routers Summary
In summary, you need
- an Access Point, primarily for handling the access controlling needs of connecting users. This is the Captive Portal engine, so to speak.
- a Router modem, responsible for taking users, connected to the Access Point above to the Internet. One that supports GSM Network SIMs are great.
Our next target, assuming we have a DD-WRT supported device purchased, is to flash the DD-WRT Firmware onto this device.
The next section handles just that. We’ll do all the client-side related configurations now. Then later, we’ll dive into the server configurations.
Dr. DD-WRT
I don’t have enough space to hold all the information about DD-WRT. The web is full of this awesome HotSpot Captive Portal Capable Firmware, which so happens to also support as many routers as possible you can think of.
So, what is the DD-WRT Firmware?
“DD-WRT is a Linux based alternative OpenSource firmware suitable for a great variety of WLAN routers and embedded systems. The main emphasis lies on providing the easiest possible handling while at the same time supporting a great number of functionalities within the framework of the respective hardware platform used.”, as described by the official DD-WRT website.
Read all you want, about DD-WRT, however make sure to come back and read on how to get it tick with a RADIUS Server using the Chillispot implementation
The reason why we’re going to use DD-WRT should be obvious from the above description (and their website). In case that’s still not clear, it is simple: we end up getting extra functionalities, like the HotSpot feature and tons of other options and configurations for free, for less installation size, yet faster speed
The default Firmware that comes with the Linksys e1200 Router is relatively extremely limited in what is possible and leaves power users no choice than to use a new firmware, such as the DD-WRT.
DD-WRT isn’t the only Open Source Router firmware out there or one that supports the HotSpot feature. Open-WRT is one of such clan, with tons of extra features. However, DD-WRT excels with additional features Open-WRT doesn’t have, or if the latter does, is way outdated or clumsy to configure.
DD-WRT comes with a little bit of ease, with support for even third-party Chillispot Service Providers.
I used DD-WRT and will be covering that in this article. If you have OpenWRT, maybe you can follow along to get the understanding, although I have not idea how it is done on OpenWRT.
This section assumes you have your Linksys e1200 Router working. To get it set up, you might need a Windows computer to run the accompanying software on the CD found in the Router’s box. If you don’t have the CD, download the software from the web.
The setup software will guide you on how to get started. Get the router setup, connect to the internet to ensure everything is working fine, then let’s go
Installing/Flashing Firmware
Find your device in the Router’s Database of DD-WRT supported devices. Follow the instructions on the database website, locate your device, then actually follow the flashing instructions, which I summarize here, however, do check the site for any updates in how the flashing should happen.
At the time of writing this article, here is how it goes:
- Download the DD-WRT Firmware for the e1200v2 Linksys
- 1) Flash this First: *mini-e1200v2.bin
- 2) Flash this Second: Mega.bin
- The above order matters
- Connect your Linksys Router to your Computer via the network cable. Note: Flashing the firmware can happen over the Wireless interface, but do you really wanna risk the airways? Cable is better, and in many cases reliable.
- Reboot the Linksys Router. It can just be a turn-off-turn-on thing, via using the
Rebootbutton, or just a simple power cable unplug-wait-a-while-plug - Access the Web UI over 192.168.1.1

- Locate the
Firmware Updatepage - Flash number 1) dd-wrt.v24-19519_NEWD-2_K2.6_mini-e1200v2.bin FIRST
- Wait 2 minutes. It will reboot on its own. Wait about another 2 minutes until it finishes booting.
- Access the Web UI over 192.168.1.1, and locate the
Firmware Updatepage - Flash number 2) dd-wrt.v24-29519_NEWD-2_K3.x_mega-nv64k.bin SECOND
- Wait till it reboots on its own. Give it about 5 minutes for all dusts to settle.
You should have DD-WRT Mega firmware installed, which comes with almost all the features there is in DD-WRT.
Configuring
Let’s dive right into configuring our Chillispot. Under the Services > Hotspot tab, enable Chillispot.
First of all, we wish to separate our LAN (our access to the Router via cable) from the WiFI (our access to the Router via Wireless)
In applying a Chillispot, Captive Portal, we want to target only connections coming through the WiFi interface, and not the LAN interface. Thus, by separating both interfaces, we get the chance to apply the Captive Portal functionally to only those who connect through Wireless.
Should someone, likely the administrator, connect via the cable, authentication won’t be required to use the internet.
In addition to users connecting through the Wireless authenticated before accessing the internet, the Router’s Web UI won’t be accessible from the Wireless connection network.
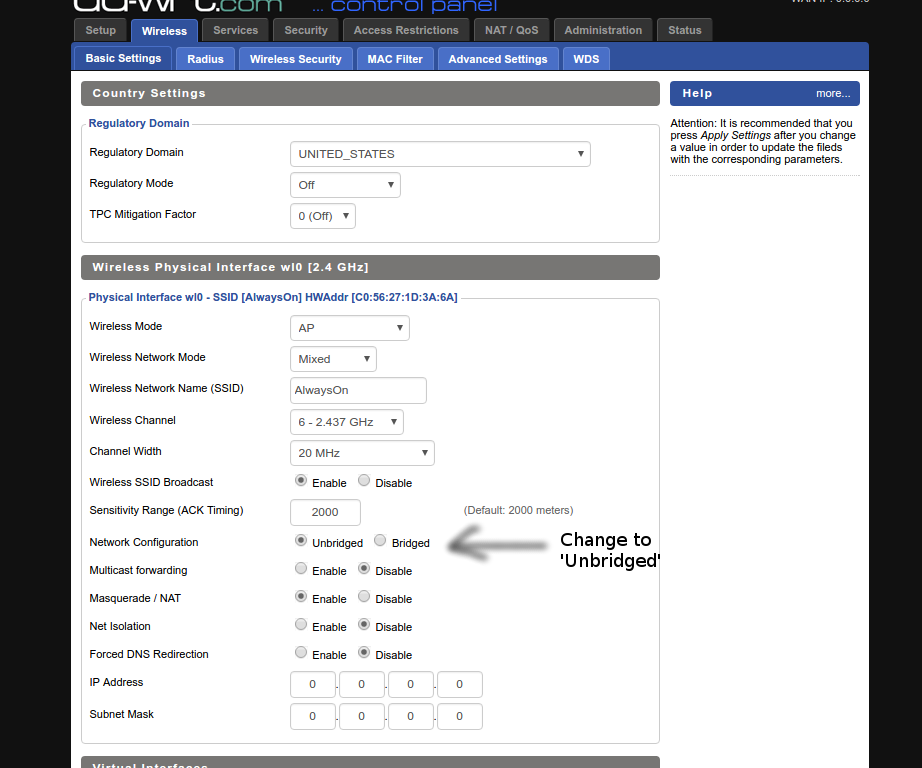
Under Wireless > Basic Settings check the Unbridged box, click Save and Apply Settings
We’ve now unbridged both interfaces.
Now to the fun part. Applying our Captive Portal functionality.
Captive Portalling
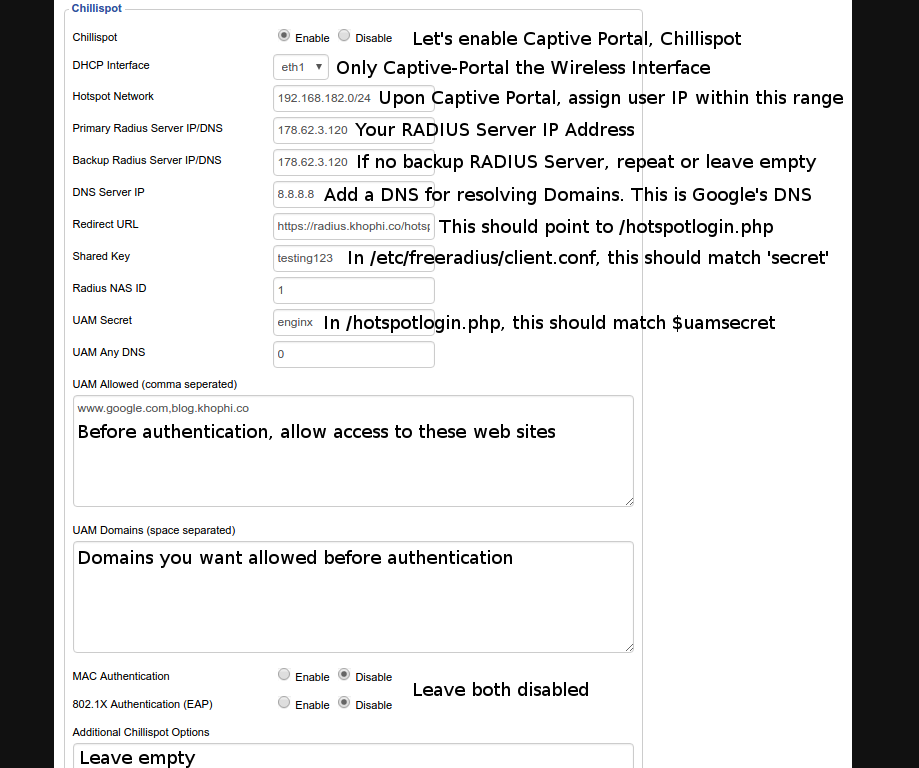
Below is an image with related text, explaining what each field is responsible for doing. Remember, the setup below is simply to share the most minimum required on the client side to have a working Captive Portal working.
Reference the Chillispot AAA Official Documentation for more.
Assuming your eyes aren’t built to see images, but read the text, here’s the above image, explained, with a bit of flesh attached.
The Chillispot configuration is found under the Services > Hotspots tab. Under this tab, you find other third-party options for implementing Captive Portals.
In fact, I tried a couple of them. Some worked great, except, well, I want to deploy my own ‘thing’. If for nothing, at least the learning experience is worth it and fun. Plus understanding what is happening at every stage helps me to know what to do and whatnot.
After enabling the Chillispot section, a few extra checkboxes and input fields show up right in our face. Let’s get to filling them right about now.
There’s no better time than now, right?
[wp_ad_camp_1]
DHCP Interface: Select eth1 which refers to the Wireless interface, or in other words, the part of the Router that handles users connecting wirelessly. In the router, there are two interfaces, one where someone can connect via cable, and one via Wireless. The wireless interface, in this case, is named, eth1
The cable interface is the LAN. Weird choice of namings, if you ask me. Well, that’s clear and makes sense at least.
HotSpot Network: Think of it this way. When the chillispot/captive portal is in action, and users connect, what range of IP Addresses should be assigned the users?
In other tutorials online, the term Remote Network is used here instead. Kinda a bit of inconsistency, but know they mean the same thing. When Remote Network is used, it might be because the Chillispot Service Provider isn’t local, rather remote, and will be assigning the IPs. Maybe that’s why. Well!
In this case, the IP, 192.168.182.0/24 is the range of IP addresses that’ll be assigned our Wireless users. That gives us support for about 200 connections (if only the Router supports up to that number, and your internet network can handle the stress).
So expect any device connecting via the Wireless interface to be assigned an IP address within this range, beginning 192.168.182.2-253 (right? Not a networking guru)
Primary/Backup RADIUS Server IP/DNS: Add your RADIUS Server IP address in here. For me, my RADIUS Server IP was khophi.co (178.62.3.120). Where you’ve deployed your RADIUS Server might be different from mine. Change this accordingly.
Don’t try connecting to my RADIUS Server. It might be down or your client not allowed
The Chillispot will be communicating to this server via the ports 1813 and 1814. Make sure they’re open on the server for communication.
More on that under the RADIUS Server section below.
If you do not have a secondary or backup RADIUS Server as a fallback should the Primary fail, you could leave the Backup field empty or repeat the Primary address.
DNS Server IP: I go with Google’s DNS, 8.8.8.8, all the time. Works all the time, at almost everywhere in the world, so a fair bet!
Redirect URL: The redirect URL refers to the hotspotlogin.php file for authentication in the DaloRadius portal2 hotspotlogin folder. More on that later on too.
But, quickly, the NAS (this case, our router), should a user connect without authorization to proceed, is responsible for directing the user to somewhere to be authenticated. That redirection link is this Redirect URL.
It is during the redirect that other details such as Shared Key and UAM Secret are carried along.
Shared Key: This shared key will be configured in the /etc/freeradius/clients.conf file on the RADIUS Server. We’ll get there soon. But know that, this key should match the one found in the clients.conf eventually.
RADIUS NAS ID: In DaloRadius interface, you get the chance to create NASes. Tailoring a NAS to the request allows for accounting and monitoring eventually? (I’m just guessing here!)
UAM (Universal Access Method) Secret: This secret should match what is set in the daloradius/library/daloradius.conf.php file on the server, within the DaloRadious installation.
We’ll get there soon. Hold on tight.
UAM Any DNS: Eeeerm, don’t worry about this, should you? Maybe not. Remember, we’re looking for the minimum configurations to get our basic Captive portal working. I doubt this is one of it.
UAM Allowed: Are there any IP addresses or websites you want accessible by users even before they authenticate? Please put them here, separated by commas, as many as you like.
UAM Domains: Any domains or IP addresses you want accessible before authentication, separated by spaces.
Additional Chillispot Options: I leave this option empty too.
Go ahead to Save and Apply Settings
After applying settings and saving, do these:
- simply reboot the NAS or Router or Access Point
- patiently wait for about 6 minutes for Router to fully reboot, and settle with your Chillispot configurations.
Don’t rush to test the network yet. Two more steps to go: Installing and Configuring our RADIUS Server in the cloud, and installing our DalaRadius for RADIUS Web Management.
RADIUS Server
A RADIUS Server is a lot of things, at least based on where and how I’ve read it has been implemented.
Remote Authentication Dial-In User Service (RADIUS) is a client/server protocol and software that enables remote access servers to communicate with a central server to authenticate dial-in users and authorize their access to the requested system or service.
Read more about this technology on Wikipedia.
What we are most interested in this RADIUS Server is the AAA – Authentication, Authorization, and Accounting. The Free Technical Guide on RADIUS might help you get up to speed with the AAAs.
In a nutshell, RADIUS Server allows us to check if we know who whoever comes in says he/she is. We get to determine what the user who came in can or can’t do or is allowed to have or not via authorization.
Via Accounting, we put all what happens after user is authenticated and authorized in a book, record keeping, for insights, and understanding and reporting.
Read more about RADIUS to get the gist of what it offers, however in this article, we get to scratch the surface and only the surface.
Install the RADIUS
Our RADIUS Server can be installed locally, if you plan to use your local machine, in conjunction with a NAS. However, in my case, my local wasn’t luxurious enough to get the 24/7 uptime, unlike my remote VPS.
So, in this article, we will install the RADIUS Server in the cloud, and as seen from the previous chillispot section, point our NAS to the remote server for our AAAs.
I use Ubuntu 16.04 LTS Server Editing on Digital Ocean VPS Droplets. If you’re on a different OS, you might need to consult any articles relating to them.
We will be using a pre-built binary here to make our life easier. For the geeks who can’t use a software without compiling it themselves, you can grab the source code of one of the most popular Open Source implementation of RADIUS, FreeRadius and use it as it pleases you.
Visit http://freeradius.org to learn more
Let’s install Freeradius then, along with other moving parts we’re gonna need:
Assumptions: Continuing to install Freeradius, these assumptions are implied:
- Nginx 1.10+ installed
- PHP 7.0+ installed
- MySQL 5.7+ installed
- Pear DB installed
$ sudo apt install freeradius freeradius-mysql freeradius-utils
$ sudo service freeradius status
$ sudo ufw allow 1812/udp
$ sudo ufw allow 1813/udp
You need to open the 1812 and 1813 ports to allow outside communications to reach the RADIUS Server
If the Freeradius status returns a non-active RADIUS, please start the service.
That’s it! Short and sweet.
Configuring MySQL for Freeradius
$ sudo mysql -u root -p

mysql > CREATE DATABASE radius;
mysql > GRANT ALL PRIVILEGES ON radius.* to radius@localhost IDENTIFIED BY "password";
mysql > \q

$ sudo mysql -u root -p radius < /etc/freeradius/sql/mysql/schema.sql

$ sudo mysql -u root -p radius < /etc/freeradius/sql/mysql/nas.sql

$ sudo mysql -u radius -p

mysql > use radius;
mysql > INSERT INTO radcheck (UserName, Attribute, Value)
     -> VALUES (‘test', ‘Password', ‘testpassword');

mysql > \q
The above in English:
- We log into MySQL Root
- Second line too obvious to explain
- We create a new user namely,
radiusand grant all privileges onradiusdatabase and any other databases beginning with the lettersradius. - Exit
- We import the
schema.sqlandnas.sqlcommands which’ll be run to shape ourradiusdatabase to be ready for ‘Radiusness’ - Now, in the
radiusdatabase, as weuseit, we insert a test user, namely,test, with password,testpassword - Quit
Configuring Freeradius itself
$ sudo nano /etc/freeradius/sql.conf

# Connection info:
server = "localhost"
login = "radius" # database name from previous
password = "00113399" # password to access

# uncomment to become
readclients = yes
Save and exit
Let’s continue:
$ sudo nano /etc/freeradius/sites-enabled/default

Uncomment the "sql" option in the following sections:
 - Authorization
 - Accounting
 - Session
 - Post-Auth-Type
Save and exit
$ sudo nano /etc/freeradius/radiusd.conf

# Uncomment the following option
$INCLUDE sql.conf
Sae and exit
Now, stop the Freeradius Server with
sudo service freeradius stop
and spin it up again in debugging mode using
sudo freeradius -X
Whiles the above is running, attempt authenticating with this (in a different terminal tab)
sudo radtest test testpassword localhost 18128 testing123
A response similar to one below should be presented to you.
Sending Access-Request of id 68 to 127.0.0.1 port 1812
User-Name = "test"
User-Password = "testpassword"
NAS-IP-Address = 127.0.1.1
NAS-Port = 18128
Message-Authenticator = 0x00000000000000000000000000000000
rad_recv: Access-Accept packet from host 127.0.0.1 port 1812, id=68, length=20
Should the above happen, we know our Freeradius is working as it should!
The last step in the process is attaching our Freeradius web management UI, DaloRadius to the whole scheme, along with our Login pages. Let’s get to it.
DaloRadius
“daloRADIUS is an advanced RADIUS web platform aimed at managing Hotspots and general-purpose ISP deployments. It features rich user management, graphical reporting, accounting, and integrates with GoogleMaps for geo-locating (GIS).” – DaloRADIUS
It provides the web interface for you to communicate with your RADIUS Server and configure it. Although you shouldn’t expect to see the most beautiful, ‘bootstrappy’ look, it works, and DaloRADIUS is actually way easier and faster to setup.
I tried RadiusDesk. Although installing on a free Droplet was extremely a single command using the RadiusDesk installer, I didn’t want to create a separate VPS when my current one has lots of resources and space to spare.
Speaking of setup, it is time to install DaloRADIUS.
Download the latest version from http://sourceforge.net/projects/daloradius/files/, then process the .tar.gz like so:
$ wget source-to-download-file/daloradius-0.9-9.tar.gz  //download
$ tar xvfz daloradius-0.9-9.tar.gz  //extract
$ mv daloradius-0.9-9 daloradius //rename
$ mv daloradius /var/www
$ cp -R /var/www/daloradius/contrib/chilli/portal2/hotspotlogin /var/www/daloradius

sudo chown -R www-data:www-data /var/www/daloradius
sudo chmod 644 /var/www/daloradius/library/daloradius.conf.php
Quickly, let us setup our connection between Dalo and our Freeradius. First, let’s import some DaloRADIUS to help speed things up.
sudo mysql -u root -p radius < /var/www/daloradius/contrib/db/mysql-daloradius.sql
$ sudo nano /var/www/daloradius/library/daloradius.conf.php

# Change these in the daloradius.conf.php accordingly
$configValues['CONFIG_DB_ENGINE'] = 'mysqli';
$configValues['CONFIG_DB_HOST'] = 'localhost';
$configValues['CONFIG_DB_PORT'] = '3306';
$configValues['CONFIG_DB_USER'] = 'radius';
$configValues['CONFIG_DB_PASS'] = 'yourdatabasepassword';
$configValues['CONFIG_DB_NAME'] = 'radius';

$ sudo nano /var/www/daloradius/library/opendb.php

# Add this to bottom of file:

$dbSocket->query("SET SESSION sql_mode = '';");
Our DaloRADIUS is ready to be served. However, we need to be able to access it via the browser, so Nginx will be helping us with that.
Since Dalo is merely a PHP site, we just need to throw in the PHP Nginx flavor so the .php files are processed appropriately.
This can be easily achieved via something like this. You know where to put this and appropriately bring it up.
# The hotspot won't let you use it
# if not SSL
server {
    listen 443 ssl http2;

    root /var/www/daloradius;
    index index.php hotspotlogin.php;

    server_name radius.example.co;

    # See sections below to learn what these files might contain.
    # These are how I structured my ssl stuff. Yours might differ
    # Just tailor it to your needs.
    include /etc/nginx/ssl/globalssl.conf;
    include /etc/nginx/snippets/statics.conf;

    location / {
        try_files $uri $uri/ =404;
    }

   location ~ \.php$ {
        include snippets/fastcgi-php.conf;
        fastcgi_pass unix:/run/php/php7.0-fpm.sock;
        fastcgi_param SCRIPT_FILENAME $document_root$fastcgi_script_name;
    }

    location ~ /\.ht {
        deny all;
    }

}

server {
    listen 80;
    server_name radius.example.co;
    return 301 https://$server_name$request_uri;
The /etc/nginx/ssl/globalssl.conf can be like this:
    ssl_session_cache shared:SSL:10m;
    ssl_session_tickets off;

    ssl_ecdh_curve secp384r1;

    resolver 8.8.8.8 8.8.4.4 valid=300s;
    resolver_timeout 5s;

#    add_header Strict-Transport-Security "max-age=63072000";
#    add_header X-Frame-Options DENY;
#    add_header X-Content-Type-Options nosniff;

    ssl_session_timeout  10m;
    ssl_stapling on;
    ssl_stapling_verify on;

    ssl_certificate /etc/letsencrypt/live/your-domain/fullchain.pem;
    ssl_certificate_key /etc/letsencrypt/live/your-domain/privkey.pem;

    ssl_protocols TLSv1 TLSv1.1 TLSv1.2;
    ssl_prefer_server_ciphers on;
    ssl_ciphers 'SHA-ETC-STUFF-HERE';

    ssl_dhparam /etc/nginx/ssl/dhparams.pem;
Note: How my SSL is structured might differ from yours. Just know where to put what and point to them accordingly.
Your /etc/nginx/snippets/statics.conf might also look like this:
### DISABLE LOGGING ###
location = /robots.txt { allow all; access_log off; log_not_found off; }
location = /favicon.ico { access_log off; log_not_found off; }

### CACHES ###
location ~* \.(jpg|jpeg|gif|css|png|js|ico|html)$ { access_log off; expires 60d; }
location ~* \.(woff|svg)$ { access_log off; log_not_found off; expires 60d; }
location ~* \.(js)$ { access_log off; log_not_found off; expires 60d; }

### Caching
gzip_vary on;
gzip_disable "msie6";
gzip_comp_level 6;
gzip_min_length 1100;
gzip_buffers 16 32k;
gzip_proxied any;
gzip_types text/plain aplication/xml text/css text/js text/xml application/x-javascript text/javascript application/javascript application/json application/xml+rss;
Now, back and continuing…
If you’re confused about where and how to put the above, it might happen like this:
sudo nano /etc/nginx/sites-available/radius

# add the text above into it

sudo ln -s /etc/nginx/sites-available/radius /etc/nginx/sites-enabled
sudo nginx -t
With sudo nginx -t you have the chance to test your Nginx configuration if everything is okay, otherwise, kindly fix the errors.
Because SSL is required to use the HotSpotlogin, you might be wondering where to get one. Simply use LetsEncrypt. Check out the Ubuntu 16.04 LTS guide.
The above is intended to be accessed via radius.example.co (a subdomain setup). You should be pointing to the subdomain right via your Domain Networking section if you’re using Digital Ocean Nameservers.
Hotspot Login
This is the login page for when a user is redirected and needs to authenticate. The only change we need to do to get this working is adding the UAM Secret.
This is achieved like so:
sudo nano /var/www/daloradius/hotspotlogin/hotspotlogin.php

# change this to match what you choose in router chillispot UAM Secret
$uamsecret = "enginx";
Restarting Spree
As we bring our configurations to an end, we need to test everything. At least, we’ve tested the workings of the RADIUS server and know it works.
$ sudo service freeradius start
$ sudo service freeradius status

$ sudo service nginx restart
$ sudo service nginx status
At this point, our NAS is already configured to be in sync in terms of settings with their corresponding matches on the Server-Side.
Test your installations.
Add a NAS Client
This last step is crucial to ensure your RADIUS Server accepts communications from your NAS.
There are two ways to this part:
- Manually adding a client to the
clients.conffile in Freeradius, - Adding a client via the DaloRADIUS management interface at radius.example.co/mng-rad-nas-new.php – This is found under Managements > Nas tab.
Manually to clients.conf
Open your /etc/freeradius/clients.conf and let’s add this just before the localhost { client block.
client ddwrt {
        ipaddr = 41.189.163.45
        secret = testing123
        require_message_authenticator = yes
}
Save the file, and reload your Freeradius service.
A client refers to potential communicators with the RADIUS Server. This ensures the RADIUS Server agrees to communicate with specific conversations coming from specific IP addresses.
Maybe it is for a security reason, to ensure the RADIUS thins the herd and becomes selective as to who to listen to and whatnot.
So, if you know the IP address your Router will be sending out to the Server, you may attach it directly. In reality, if you’re behind a dynamic IP, as in one automatically assigned you by an ISP, you might want to include dynamic clients.
This will allow RADIUS to be comfortable talking to IP addresses from a range of addresses.
Via DaloRADIUS
The screenshot below paints the picture here. Just as the configuration specific above, you enter the details under the Management > Nas tab.
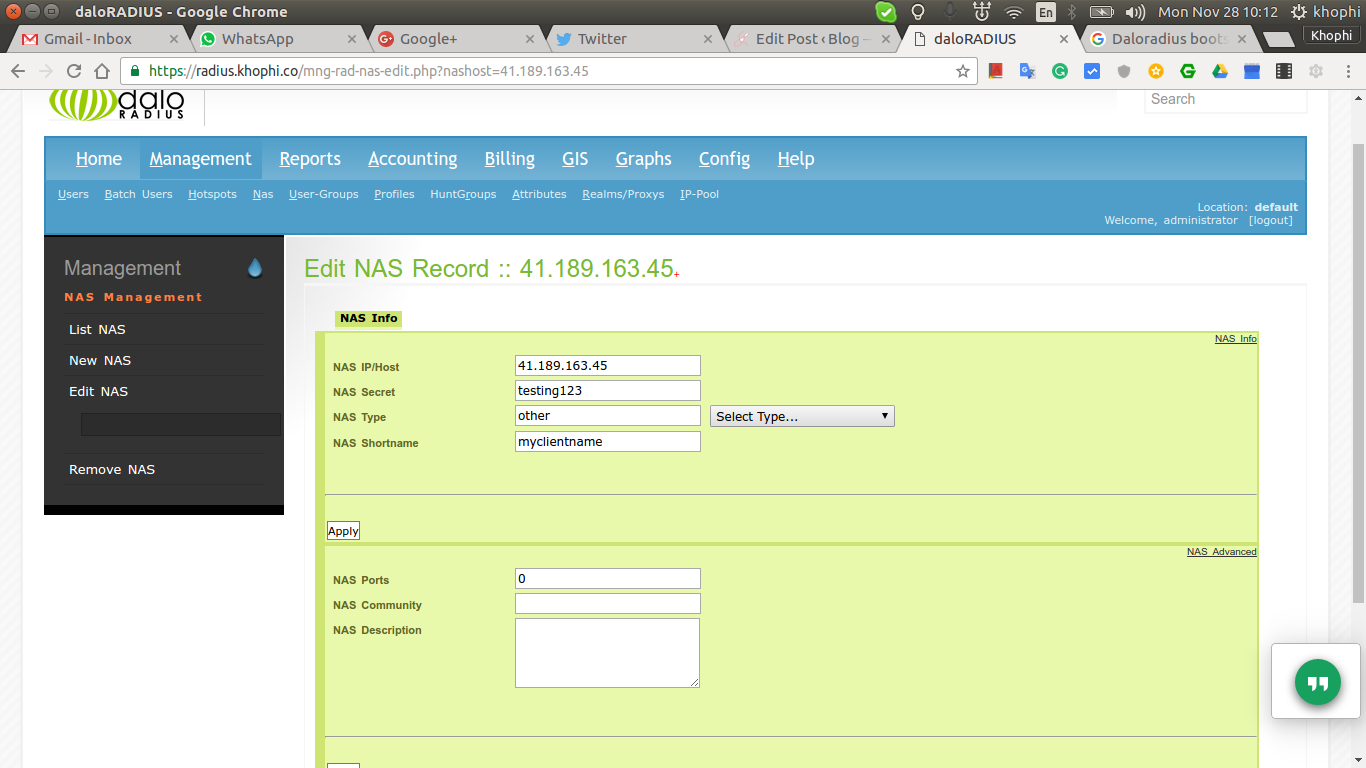
Save the changes you do and you’re good to go.
This second approach might be easier as you do not have to be hitting your Droplet anytime you want to make changes to your Clients list.
See a follow-up article on how to get DaloRADIUS Profiles working for enforcing user connection restrictions and authorizations.
Troubleshooting
Troubleshooting all that we’ve done so far is critical. So, let’s see areas we might have to look when issues strike.
- One primary way to debug is to run Freeradius in debug mode. Do so via
sudo freeradius -X - See the
/var/logs/freeradiusfolder foraccess.loganderror.logfiles. Both contains information that might help you understand what something ain’t happening right at your RADIUS Server level. - See the errors in the browser when dealing with DaloRADIUS or the HotSpotLogin templates.
- Leave a comment below, I might be able to help.
Conclusion
The entire moving parts above to make sense, and are easy to setup. It is just unfortunate it is hard to find all the puzzle pieces in a single spot. I hope you get to deploy your own basic RADIUS Server for use in your neighborhood Bar HotSpot or something similar.
Lemme know in the comments any mistakes I might have made or a configuration that isn’t right. I’m still new to this RADIUS and ‘circumference’ thing, so happy to get things right and get to learn more.
Hope you enjoyed it, and see you in the next one.