Setting up Flutter for the First Time [With Android SDK]
Let’s get right into it. How to set up Flutter for the first time with Android’s SDK up and running. We’re only setting up Android’s SDK. No Android Studio. If you wanna learn the installation of the Studio, this ain’t the place for you. We’ll be using the SDK for command line only.
It’s fun, trust me!
First of all, clone flutter. I choose to have my Flutter setup in the ~/.flutterSetup hidden directory.
git clone https://github.com/flutter/flutter.git ~/.flutterSetup
Note, you might wanna save yourself from downloading the relatively big Flutter repository. Simply clone with a depth of 2 or 3, to download a relatively smaller working repository.
Learn more about shallow cloning: https://git-scm.com/docs/git-clone
Next, add flutter to your system variables.
nano ~/.bashrc and add the text below to the bottom of the file.
export PATH=~/.flutterSetup/bin:$PATH
Do source ~/.bashrc to reinitialize the terminal with the changes to the .bashrc file.
Now, run flutter doctor
Follow any prompts that might show up, and resolve accordingly.
In my case, one of the errors was this:
[!] Flutter (Channel master, v0.0.0-unknown, on Linux, locale en_US.UTF-8)
✗ Downloaded executables cannot execute on host.
See https://github.com/flutter/flutter/issues/6207 for more information
On Debian/Ubuntu/Mint: sudo apt-get install lib32stdc++6
On Fedora: dnf install libstdc++.i686
On Arch: pacman -S lib32-libstdc++5
You know what to do from the above.
If you don’t have Android installed, Flutter doctor will diagnose the disease caused by the Lack of Android.
If that’s the case, follow the step below to install Android’s SDK.
Android’s SDK
Download Android’s SDK (only the command line tool version. We don’t need the entire Android Studio enchilada)
https://developer.android.com/studio/#downloads
Extract the downloaded .zip into the folder ~/Android/, then rename the folder as sdk
Therefore, you end up with something like this: /home/your-username/Android/sdk or in other words, ~/Android/sdk
If that’s the folder structure you end up with, then add these to your system path.
export ANDROID_HOME=/home/khophi/Android/sdk
export ANDROID_SDK_ROOT=/home/khophi/Android/sdk
export PATH=$PATH:$ANDROID_SDK_ROOT/tools:$ANDROID_SDK_ROOT/platform-tools
Do a source ~/.bashrcagain to reload the changes to the bash file into the terminal.
Running flutter doctor should reveal no Android related errors.
Remember: You must have Java installed. On Ubuntu, install this way:
sudo apt install openjdk-8-jdk
Go into ~/Android/sdk/tools/bin and let’s have fun.
In the folder above, run ./sdkmanager --list
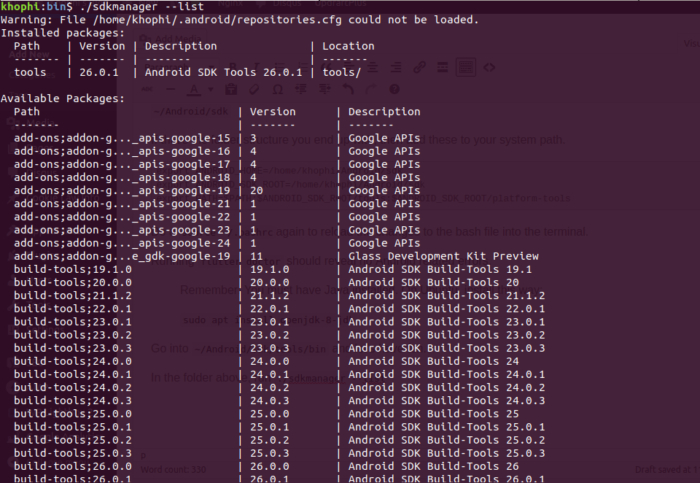
Magic, right?
Naaa. Just the handiwork of great minds. Let’s enjoy the fruits of their hard work.
Let’s get up to speed with latest updates, by doing ./sdkmanager --update to update the SDK
Now time to install a few system images and platform tools and build tools, in one scoop. Here we go
I prefer to have the most stable, and 1 previous developer version of Android. So at the time of writing, it was Android API 27 = Android 7 = Android Nougat. The bleeding version is API 28 = Android 8 = Android P (🤷♂️). One previous version of the stable is API 26 = Android 6 = Android M (mashmallow)
./sdkmanager "system-images;android-27;google_apis;x86" "system-images;android-26;google_apis;x86_64 "
./sdkmanager "platform-tools" "platforms;android-26" "platforms;android-27"
./sdkmanager "build-tools;27.0.3" "build-tools;26.0.3"
Create Android Virtual Device
This part is necessary, unless you always would connect your physical android phone to your machine during development, when you have ADB enabled and connected to your computer.
But with Android Virtual Device, you could have the Android Phone simulation happening right on screen. Pretty handy.
So, go into cd ~/Android/sdk/tools/bin/
Then
./avdmanager create avd -n khophi -k "system-images;android-27;google_apis;x86"
Go here to learn what each commands means if they’re not already obvious: https://developer.android.com/studio/command-line/avdmanager
The system-images should be what you’ve already installed in the previous step.
If all goes well, you should be able to do
cd ~/Android/sdk/emulator
./emulator -avd khophi
You might get some missing/not found error the first time. Re run the command, and all should go well.
Conclusion
These are the steps I go through in setting up my Flutter & Android SDK Command Line anytime I do a new system install. Currently using Ubuntu 18.04 LTS.
However, I’ve left some troubleshooting steps below as some of the errors I came across in the process and how the internet helped me get it fixed.
Troubleshooting
You might come across a few errors here and there. Below are some I came across and how I fixed.
“This user doesn’t have permission to use KVM (/dev/kvm)”
To fix, do this, as found here: https://help.ubuntu.com/community/KVM/Installation
Install some things:
sudo apt-get install qemu-kvm libvirt-bin ubuntu-vm-builder bridge-utils
Then add your user to a user group that’ll be created as a result of installing the above things.
sudo adduser `id -un`libvirt (if on 18.04 LTS. On anything other than that, you might wanna use libvirtd instead)
Reboot your computer. Re-login is suggested, but didn’t work for me. My GUI got messed up somehow. Only resumed only after actual reboot.
If you’re not able to press the power button continously to shutdown because you’ve enabled it for suspend, simply use the Ctrl + Alt + F1/F2/F3to open up a terminal at the broken session login screen. You know what to do henceforth.
“libGL error: unable to load driver: i965_dri.so”
A very weird error.
Solution? Open ~/.bashrc and add this a the bottom
export ANDROID_EMULATOR_USE_SYSTEM_LIBS=1
Then close and open terminal to proceed with your AVD commands, or simply run source ~/.bashrc to reload your bash conf
