It is called curiosity. To others, it is a disease. But whatever! I saw OnlyOffice, and although I was in the middle of watching The Flash on my resurrected Xperia Z2, I jumped myself out of bed to install OnlyOffice, under 15 minutes.
In this article, you’ll do it, in under 3 minutes:
- Install OnlyOffice
- Adapt to work on a subdomain instead of default localhost
- Run and profit!
What is OnlyOffice
OnlyOffice is a lot of things, however, lemme try to simplify it. Roughly speaking, OnlyOffice allows you to run something similar to Google Docs, instead of on Google Servers, this time, on your own instance or server. You run it, you deploy it, you manage it, you, I mean, you everything it, the way you want.
I know, I know, but….

The fun doesn’t end there.
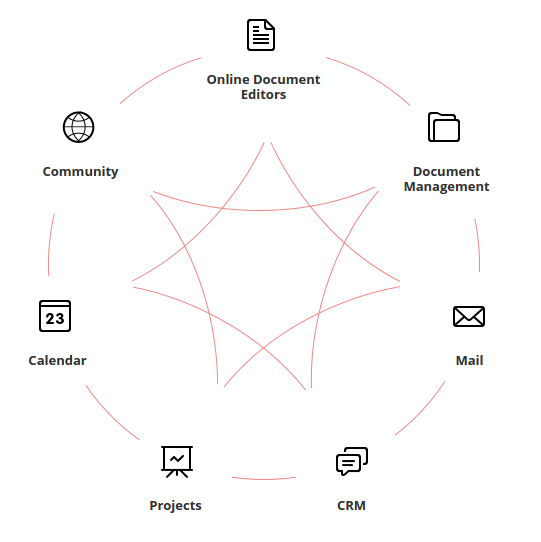
Below is an image of what OnlyOffice promises you in a single package. A package with so many mouth-watering goodies, my first instinctive move was to take it for a spin.
Think of Google Docs (including spreadsheet, presentation), Zoho Mail, maybe BaseCamp, Google Calendar, your favorite CRM, all merged under a single umbrella, an umbrella you get to take with you, in your pocket, on your PC, within your company, at the enterprise level, the way you want it.
For a complete, detailed possibilities awaiting you with OnlyOffice, check out their features page.
And for those of you who don’t have time reading features, rather wanna deep dive, getting your hands, body and minds dirty with all it takes, please, proceed!
Installation Time!
The recommended system requirements we’re looking at is this:
- CPU dual-core 2 GHz or better ( I used 1 CPU, working so-so)
- RAM 2 GB or more (I used 1 GB RAM, working so-so)
- HDD at least 2 GB of free space
- Additional Requirements at least 2 GB of swap
- OS amd64 Linux distribution with kernel version 3.10 or later
Additional Requirements
- mono: version 4.2 or later (will install below)
- MySQL: version 5.5 or later (Install it yourself)
- MySQL 5.7 is not currently supported. If due to a certain reason you are nevertheless using MySQL 5.7, your portal will not work if you have not specified a password during the MySQL installation process.
- Nginx (install this yourself)
I assume you’re using Ubuntu 16.04 LTS, at least that’s what I spin my on.
So, first, we need the mono-project packages installed. Trust me, I have no idea what that is, except it is developed by Microsoft, and helps with creating cross-platform applications. I stand to be corrected.
Well, enough of that. On Ubuntu 16.04, we go like this:
$ sudo apt install mono-complete
With the mono-project out of the way, now to the actual fun part, installing the onlyoffice community server.
OnlyOffice comes with other options you might wanna look into. See Official website for details.
$ wget http://download.onlyoffice.com/repo/onlyoffice.key
$ sudo apt-key add onlyoffice.key
$ sudo echo "deb http://download.onlyoffice.com/repo/debian squeeze main" |
  sudo tee /etc/apt/sources.list.d/onlyoffice.list

$ sudo apt-get update
$ sudo apt-get install onlyoffice-communityserver
The above commands are too trivial to explain.
So, we’re done, like literally, except configuring Nginx to serve OnlyOffice when requests hit from Subdomain.
Hook to Subdomain
You may choose any subdomain name you want, like office.example.com. Whatever!
Read more about how to create subdomains on DigitalOcean.
Now you have your subdomain properly setup in you DigitalOcean account online, it’s time to go into the server, and change things.
By default, right after installation, you get /etc/nginx/sites-available/onlyoffice for free, symbolic linked at /etc/nginx/sites-enabled/onlyoffice.
In the above file, you get to see many configurations within each server block, upstreaming to a socket file likely also autogenerated by OnlyOffice.
You might wanna thrown in an SSL for the subdomain the OnlyOffice runs on. LetsEncrypt lets you do so for free.
It doesn’t get easier and lazier than this, for any DevOps! All we have to do is simply include a server_name to our server blocks, and we’re done. For real done, something like this:
...
server {
	listen 80;
	server_name office.example.com;
	location / {
        ...............
	}
}

...
server {
	listen 8080;
	server_name office.example.com;
	location / {
        ...............
	}
}
The above reflects an excerpt of only where you need to make changes, simply add the server_name office.example.com part.
If you wish to listen on the 8080 port as well for likely API requests (looking at the block, I guess that’s what it does), you simply have to let the outside world get to the 8080 port, assuming you’re protecting your server with a firewall.
On Ubuntu, if you use UFW, you might wanna simply do:
$ sudo ufw allow 8080
At this stage, we’re good to restart Nginx, but to see if everything is alright, simply run
$ sudo nginx -t
If everything is okay, you’ll be told. Otherwise fix any errors or warnings that might appear, like what I came across regarding the duplicate Mime text/html on line 35 of the /etc/nginx/sites-available/onlyoffice file.
Simply fixed it by removing the text/html from the gzip_types
$ sudo service nginx restart
then open office.example.com. It should take a bit of time to get things installed. On my 1 CPU, 1 Gig RAM DigitalOcean box, it took about 5 minutes for initial setup to complete.
Once done, you’re good to go!
Uninstall OnlyOffice
On your Ubuntu box, simply do:
$ sudo apt remove onlyoffice-communityserver
The above command removes everything onlyoffice including the the nginx server block in /etc/nginx/sites-enabled/onlyoffice
Conclusion
The idea of carrying your own Docs deployment with you puts a big smile on my face. I can’t wait to see how the OnlyOffice project unfolds fully, although I’m enjoying the ride at the moment!
Have fun, and see you in the next one!