AngularFire2 Authentication
A few things have changed. To do the AuthGuard approach explained in this article today, you should check out this approach.
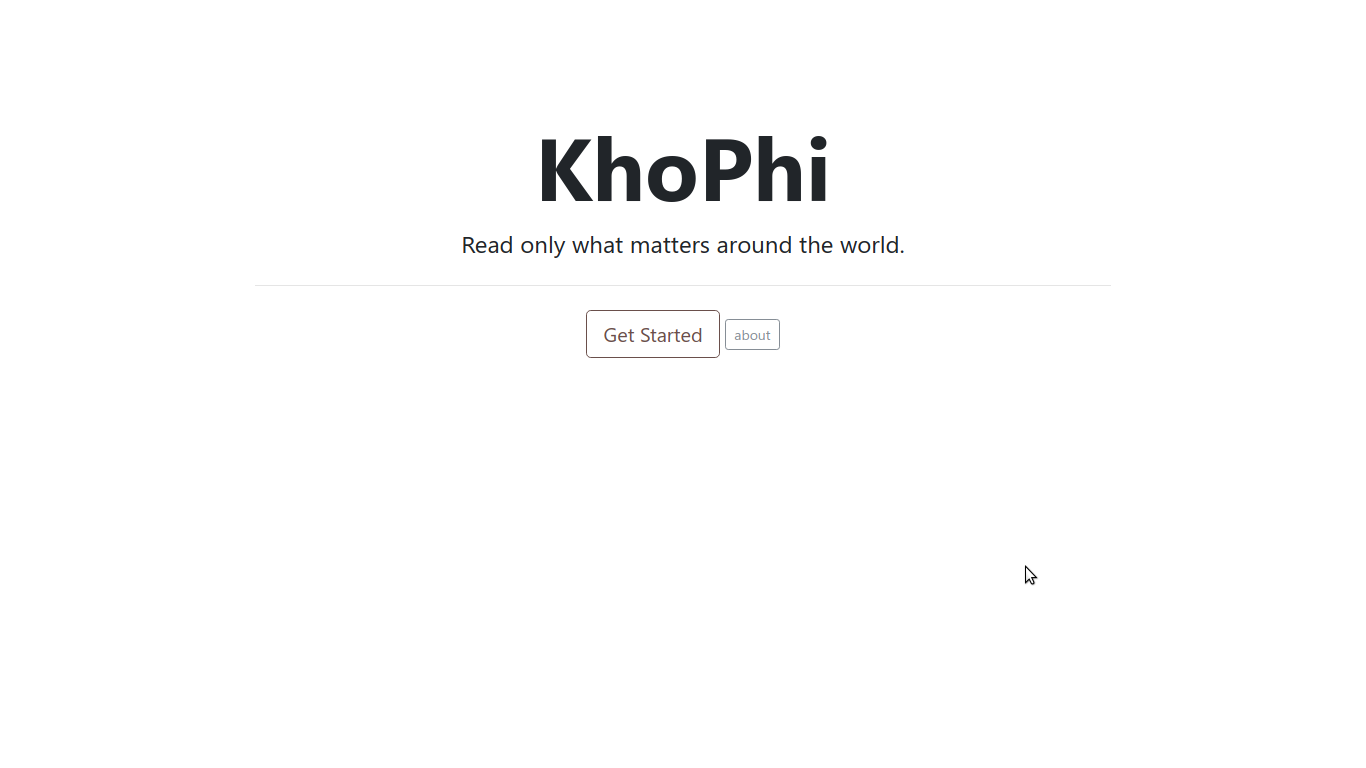
Below is what we’re going to build, in this video. For relatively longer tutorials, such as some of the ones on Ionic2, I attach a video to help readers visualize what they’ll be taking home at the end of the tutorial.
See a preview of what I intend to build with you below. In summary, we’re going to build a login, sign up AngularFire2 app with Route guards and a bit of Nested (Child) routes along the line.
This article is no different, so here we go:
https://youtu.be/LL-TLmeVBGU
My previous experience using AngularFire in building CodeBySide and MadeWithFirebase left me no choice than to get on board with AngularFire2 as quickly as possible!
In the process of building our AngularFire2 Authentication, what you see above, we’ll come across basics of these topics:
- Initializing an Angular2 Project from scratch without the Angular CLI (I don’t know why, but the ng CLI is too cumbersome to use for me. Well, that’s another topic for another day)
- SystemJS configurations and loading installed NPM node modules
- Getting comfortable with Angular Components
- Handling form input with the
FormModule - Using the
NgModuleto encapsulate features or functionality in our app - Using the Angular 2 Final Router for Routing and creating Child Routes (Nested Routes)
- Adding Authentication thanks to Firebase 3 via AngularFire2, so AngularFire2 login and signup example
- Protecting certain routes with our Angular
AuthGuardservice - We’ll throw in a little catch-all component for our 404 needs.
Don’t be intimidated by the long list you see above. We’ll go through them pretty quickly, and before you realize, we’re done with this app.
TAKE NOTE:
For the first time, in this article, I INTENTIONALLY leave errors for you to hunt. Why?
It helps with learning. The final code in the repository will be free from errors, however, the snippets I share in this article with come with trivial errors which can be annoying to debug sometimes.
I came across many difficulties doing this project, and although it took me many hours, I’ve gained insights that I wouldn’t have acquired by simply running from a project.
So, copy-pasting the snippets from here might not do you any good. Find the errors, and get satisfied!
At the end of the article, I give the solutions to the bugs, according to their numbers. I recommend you don’t jump to look at those, but well, you just did, so what else can I say?!
Starting an AngularFire2 Project from Scratch
Clearing the path
The AngularFire2 docs only explain how to use the Angular2 CLI. In this part, we’ll be avoiding the ng CLI, and do our own thing. At least doing from scratch should help you understand ‘when and why what does what it does.’
I created this barebone, raw project setup for Angular2, picked from the Angular2 quickstart tutorial. All you have to do is this:
git clone https://github.com/seanmavley/angular2-raw-start AngularFireAuth
We’ll end up spicing what we have above a bit with some Firebase and AngularFire stuff, but for now, go into the AngularFireAuth directory, and do the usual: npm install
This assumes you have
npminstalled and working. I’m on an Ubuntu box, 16.04 LTS and so that’s what the tutorial below sticks to. Learn more about NPM.
Now that all the basic packages are down, we need to include our AngularFire and Firebase related packages and tell SystemJS where to find them and how to load them.
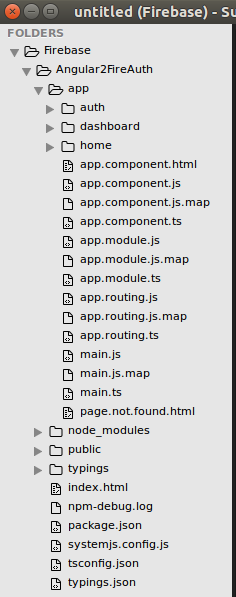
Before we do, let us bring up a basic generic Angular2 project up. The quickstart tutorial on Angular 2 official docs go over this, but let’s do it here as well. We need five files, to begin with.
Every file we create from here onwards will be within AngularFireAuth/app folder or a subfolder within the app directory unless otherwise indicated. Refer to the folder structure image above to visualize what’s at stake here.
Make an app directory in the AngularFireAuth project folder, and in there, place these files:
app/app.module.ts
import { NgModule }      from '@angular/core';
import { BrowserModule } from '@angular/platform-browser';

@NgModule({
  imports:      [ BrowserModule ],
  declarations: [ AppComponent ],
  bootstrap:    [ AppComponent ]
})
export class AppModule { }
app/app.component.ts
import { Component } from '@angular/core';
@Component({
  selector: 'root-app',
  templateUrl: 'app/app.component.html'
})
export class AppComponent { }
app/app.component.html
<h1>My First Angular App</h1>
app/main.ts
import { platformBrowserDynamic } from '@angular/platform-browser-dynamic';
import { AppModule } from './app.module';

const platform = platformBrowserDynamic();
platform.bootstrapModule(AppModule);
The above files are the most minimum files with the minimum amount of lines of code to bring an Angular2 project up and running. You could do more by shrinking them all into one file, maybe, but we’re separating each concern for now.
In Angular using UI Router, we have something like <ui-view>something</ui-view> where our templates will render within.
Angular2 comes with something similar. In fact, Angular 2 router is to some extent, powerful enough you might not need UI Router. Things like child routes and the idea of states is well baked into the final Angular 2 Router. We’ll get to more of the routes below.
Our index.html file will be where our app will be rendered. The index.html will be the project root index file (think of it as the layout.html in other frameworks, like Laravel), and NOT under the app/* directory.
Note that!
<html>
  <head>
    <title>Angular QuickStart</title>
    <meta charset="UTF-8">
    <meta name="viewport" content="width=device-width, initial-scale=1">
    <link rel="stylesheet" href="styles.css">
    <!-- 1. Load libraries -->
     <!-- Polyfill(s) for older browsers -->
    <script src="node_modules/core-js/client/shim.min.js"></script>
    <script src="node_modules/zone.js/dist/zone.js"></script>
    <script src="node_modules/reflect-metadata/Reflect.js"></script>
    <script src="node_modules/systemjs/dist/system.src.js"></script>
    <!-- 2. Configure SystemJS -->
    <script src="systemjs.config.js"></script>
    <script>
      System.import('app').catch(function(err){ console.error(err); });
    </script>
  </head>
  <!-- 3. Display the application -->
  <body>
    <my-app>Loading...</my-app>
  </body>
</html>
BUG 1: I’m a bug somewhere, look for me!
We call some of the NodeJS related modules/packages in this index.html along with our SystemJS config file.
Of course, you could perhaps put all the above code in all the files into a single one, but well, why? Angular2 is designed with components and separation of concerns in mind.
So although we could push the contents of app/app.component.html into the app.component.ts by simply using template:' ' , we reference a template file instead.
With the above in place, you should be able to go into the terminal and do npm start to bring the server up. The browser should open automatically with a loading... then My First Angular App
Did you get that working?
Firebase Time
Let’s do this!
To install angularfire2 and firebase, we need to do this:
npm install --save firebase angularfire2
The --save will add firebase and angularfire2 as dependencies for the project to our package.json file.
Now, we need to do some plumbing first with SystemJS so that we can go on with our lives with importation in our app. SystemJS is similar to Webpack. This article uses SystemJS, but I believe you could do the same thing with Webpack.
SystemJS allows us to load all the modules we need and offers us a few tricks under the hood. I won’t be lecturing you how to use SystemJS here (I’m no SystemJS expert), except showing in the example below, what to do to get our firebase and angularfire2 set free to fire!
For brevity, I’ll be showing only ‘what you need to add to where’ in the system.config.js file
/**
 * System configuration for Angular 2 samples
 * Adjust as necessary for your application needs.
 */
(function (global) {
  System.config({
    paths: {
      ....
    },
    // map tells the System loader where to look for things
    map: {
      // our app is within the app folder
      app: 'app',
      // angular bundles
      .....
      // other libraries
      ....,
      'angularfire2':               'npm:angularfire2',
      'firebase':                   'npm:firebase',
    },
    // packages tells the System loader how to load when no filename and/or no extension
    packages: {
      { ... },
      angularfire2: {
        main: './index.js',
        defautExtension: 'js'
      },
      firebase: {
        main: './firebase.js',
        defaultExtension: 'js'
      }
    }
  });
})(this);
BUG 2: I’m a stubborn one. You might find this Hint useful!
I believe what is happening in the above snippet is self-explanatory and wouldn’t need any extra commentary on my part.
The snippet comes with some inline comments that explain what is going on. For detailed explanations, you might wanna check the official docs for SystemJS.
NOTE: In the troubleshooting section in the Install and Setup guide for AngularFire2, you need to add firebase types to the
tsconfig.jsonfile. I already did that addition in the projecttsconfig.jsonfile so you wouldn’t have to. You can thank you me later, ;P
Bootstrap App with Firebase
We won’t know what we did above is well unless we try to import both AngularFire2 and Firebase. So let’s go ahead to import them into our project
import { NgModule }      from '@angular/core';
import { BrowserModule } from '@angular/platform-browser';

import { AngularFireModule,
  FIREBASE_PROVIDERS,
  AngularFire,
  AuthMethods,
  AuthProviders
} from 'angularfire2';

export const firebaseConfig = {
  apiKey: "AIzaSy-go-find-your-api-key-J4cVkI",
  authDomain: "your-auth-domain.firebaseapp.com",
  databaseURL: "https://your-database-url.firebaseio.com",
  storageBucket: "and-storage-bucket.appspot.com",
  messagingSenderId: "0000000000"
}

export const firebaseAuthConfig = {
  provider: AuthProviders.Password,
  method: AuthMethods.Password
}

@NgModule({
  imports:      [
    BrowserModule,
    AngularFireModule.initializeApp(firebaseConfig, firebaseAuthConfig),
   ],
  declarations: [
    AppComponent,
  ],
  providers: [],
  bootstrap:    [ AppComponent ]
})
export class AppModule { }
If you have BUG 2 fixed, you should be able to see no errors in your consoles, either in the terminal or browser.
In the above snippet, we simply import the parts from the angularfire2 package we need, and you can see how we put them to use.
We first put our app credentials in our firebaseConfig constant, which we end up using our initializeApp method in AngularFireModule. The second argument to our initializeApp method refers to how we want to do authentication with Firebase, which in this instance, we only want the password authentication method.
The Firebase credentials you see above can be found in your Firebase Console. I’m not giving you mine, so if you really wanna proceed, please sign up with Firebase. It is free and No Credit card required!
Note: You might get weird errors should your Provider and Method not be compatible. For instance, a provider of
AuthMethod.Popupalong withAuthProviders.Passwordwon’t work, because it makes no sense to popup another email-password form when an email-password form was already given the user and filled.See this AngularFire Issue for more details.
At this point in our app’s life, there’s no fun. It doesn’t do anything, however, if we’re to recap so far, these are what we’ve done:
- Start from scratch, an AngularFire2 project
- Created our first Component, the parent component for all other components to come, namely the
AppComponent - Initialized our project with our AngularFire tied to our Firebase configurations
- Played with SystemJS a bit
- Fixed some bugs. Be proud of yourself!
Let us move onto the next steps below
The HomeComponent
Currently, app.component.html is what displays our <h2>...</h2> . However, it’ll be best if that template is the entrance point to routing in our app.
See, a bigger picture might be this. In a (very?) big app, you might want to have a module responsible for all the unprotected, public pages, such as the About, Help, Homepage, Contact etc.
These pages with their related Components could be tucked under a single module. In our app’s case, we’re not building anything huge, so our HomeComponent is going to be our public facing endpoint, the page you don’t need to be logged in to access.
And if you’re wondering why we don’t use the AppComponent for this purpose, well, simply put, it because we have a better plan for our AppComponent guy. Just like the
Just like the <root-app></root-app> is the entry point to our entire project, app.component.html will, in turn, be the entry point to our entire components, under which other components will dance. You’ll see below how this all comes to play.
Therefore, as you’ll see, our app.component.html will host something like our navigation bar, which normally remains the same throughout our app, irrespective of whatever page you’re on. We could tuck in our footer content in this page too, but we don’t in this article. However I hope you get the point.
We go a little further eventually to make this app.component.ts tied into the app.component.html a bit auth-aware, as in show different links depending on the authentication state of the User.
Enough talking, let’s get going. Let us change our app.component.html to be this:
<nav>
<a routerLink="/">Home</a>
<span> •
<a>Dashboard</a> •
<a>Logout</a>
<span> |
<a>Login</a> •
<a>Sign up</a>
</span>
</nav>
<hr>
<p>
<router-outlet></router-outlet>
</p>
BUG 3: The building process is critical about writing good HTML. This bug is purely HTML related. See the console error to guide you.
Take note of the <router-outlet></router-outlet>
That is where the rest of our components will be injected. This is done through the work of the Angular Router.
Before we go in to check our browser for updates (which it is breaking at the moment), let’s bring in the Angular Router, and start doing some routing.
Create the file, app/pp.routing.ts and put this in there:
import { ModuleWithProviders }  from '@angular/core';
import { Routes, RouterModule } from '@angular/router';

import { HomeComponent } from './home/home.component';

const appRoutes: Routes = [
  { path: '', component: HomeComponent }
];

export const AppRouting: ModuleWithProviders = RouterModule.forRoot(appRoutes);
This is similar to ui.router or the default Router module in Angular 1. By doing path: '' we’re referring to the homepage, the localhost:8000
We’ll see how to do a .otherwise( ) route getting to the end of this article when we throw in the PageNotFoundComponent
Then we export what we have as a constant. See we do RouterModule.forRoot? If we want to do child routes, it’ll be .forChild instead. Check the Router docs on Angular2 for more details.
We reference a HomeComponent which doesn’t exist. Let’s create it:
import { Component } from '@angular/core';

@Component({
  selector: 'home',
  templateUrl: 'app/home/home.component.html'
})

export class HomeComponent {}
Put anything you want in the app/home/home.component.html template file for now.
We need to go update our app.module.ts to reflect the addition of the routing module and HomeComponent.
import { AppRouting } from './app.routing';
import { HomeComponent } from './home/home.component';
@NgModule({
  imports:      [
    BrowserModule,
    AngularFireModule.initializeApp(firebaseConfig, firebaseAuthConfig),
    AppRouting,
   ],
  declarations: [
    AppComponent,
    HomeComponent,
  ],
  providers: [],
  bootstrap:    [ AppComponent ]
})
You’re simply including the changes you find in this file into the initial one we created. The changes are: we import the AppRouting Module and the HomeComponent, then notice where we include each.
The AppRouting module goes into the imports metadata, whiles the HomeComponent sits within the declarations metadata part.
So at this point, what we’re telling Angular 2 to do is this:
Any request incoming, if it matches the default route which is '' , the route should load the HomeComponent. That component will be loaded and put within the <router-outlet></router-outlet> in the AppComponent.
I believe at this point, how the components and routing play together is clear to you.
We’ll be taking the speed up a bit as we introduce NgModule and prepare to protect our routes with Firebase Auth.
Authentication with Firebase
The chunk part of what this tutorial is about is within this section. If you were sleeping throughout the earlier part of this article, please wake up. No idea how you read-sleep, but this, the Authentication part with Firebase, probably is the reason why you came here.
Many appreciate my article on Email Verification with Firebase. You might too!
Let’s get going. Here’s what we plan to do in this mini-section:
- Create a big AuthModule to handle anything authentication related.
- This AuthModule will come with its own components and routing.
By encapsulating the feature of authentication in a module, we make it swappable and portable, easy to integrate into other projects of ours, and makes sharing easy.
AuthModule
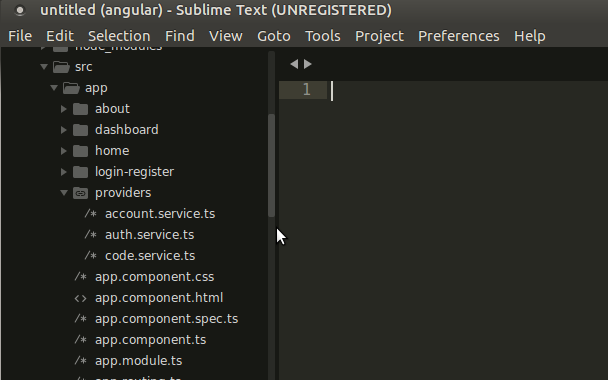
Our AuthModule will be housed within the app/auth folder, which looks something like this:
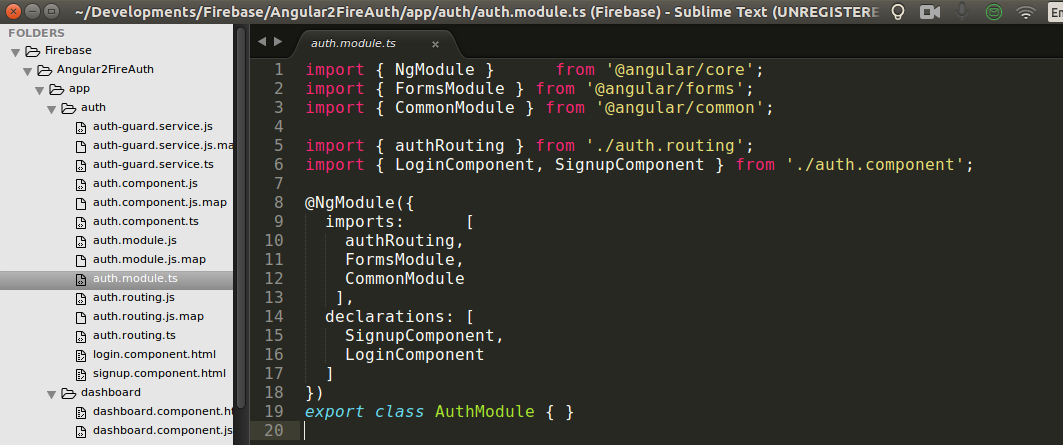
One could go ahead to put each Auth Component into their respective folders, but to keep things simple, they’re all in one folder, the app/auth at the moment.
At this point, you’ve probably noticed the
.mapand.jsfiles that are automatically created. I gitignored them all in the repo, however, they’re automatically created, so they’ll show again once you start your server. Just don’t worry about them.You can inspect them to see the transformation that happens in getting your .ts files into .js
import { NgModule }      from '@angular/core';
import { FormsModule } from '@angular/forms';

import { authRouting } from './auth.routing';
import { LoginComponent, SignupComponent } from './auth.component';

@NgModule({
  imports:      [
    authRouting,
    FormsModule
   ],
  declarations: [
    SignupComponent,
    LoginComponent
  ]
})
export class AuthModule { }
BUG 4: I intentionally left an import out from this module. Without that import, your
asyncpipe will fail in the templates that follow. You’ll hit the bug below, the missing import in the above file is the culprit. Enjoy
So, according to first-come-first-serve, let’s create whatever we import first, starting with the authRouting constant.
import { ModuleWithProviders }  from '@angular/core';
import { Routes, RouterModule } from '@angular/router';

import { LoginComponent, SignupComponent } from './auth.component';

const appRoutes: Routes = [
  { path: 'login', component: LoginComponent },
  { path: 'signup', component: SignupComponent }
];

export const authRouting: ModuleWithProviders = RouterModule.forRoot(appRoutes);
Very similar to the app.routing.ts we created earlier. The only changes are what components we call as per what path is hit.
Very straightforward. Angular2 seems like a lot to write with imports here and there, but each file, from the little experience I’ve had with it, happens to be relatively very small doing something precisely tailored to a functionality or feature.
In this case, routing for the entire AuthModule. Should we include, say a PasswordReset component, and we want to route to it, we just have to add a new path, specify the route then add the component.
We’ll also declare the component in our AuthModule, and we’re done!
Only two Components left to create within our AuthModule, the LoginComponent and the SignupComponent .
import { Component } from '@angular/core';
import { Router } from '@angular/router';

import { AngularFire } from 'angularfire2';

@Component({
  templateUrl: 'app/auth/signup.component.html'
})

export class SignupComponent {

  constructor(private af: AngularFire, private router: Router) {  }

  onSubmit(formData) {
    if(formData.valid) {
      console.log(formData.value);
      this.af.auth.createUser({
        email: formData.value.email,
        password: formData.value.password
      }).then(
        (success) => {
        console.log(success);
        this.router.navigate(['/login'])
      }).catch(
        (err) => {
        console.log(err);
        this.router.navigate(['/login']);
      })
    }
  }
}

@Component({
  templateUrl: 'app/auth/login.component.html'
})

export class LoginComponent {
  constructor(private af: AngularFire, private router: Router) { }
  onSubmit(formData) {
    if(formData.valid) {
      console.log(formData.value);
      this.af.auth.login({
        email: formData.value.email,
        password: formData.value.password
      }).then(
        (success) => {
        console.log(success);
        this.router.navigate(['/dashboard']);
      }).catch(
        (err) => {
        console.log(err);
        this.router.navigate(['/dashboard']);
      })
    }
  }
}
All the heavy lifting we’ve done up until this point, behold, the Climax!
Although the above snippet might seem too big to understand, it is probably the easiest part so far. Yes! See, we’re only calling AngularFire2 methods (which in turn map to Firebase methods), then listening for a response, either a success or a failure.
Maybe the right word to use is ‘Observe’ for a response or failure. AngularFire2 rides on the Angular2 observables and Firebase wraps around that for easy functionality.
Simple and straightforward!
The onSubmit method takes the formData from the Template-driven Form component template, accesses the specific fields we want, then passes the values into the Firebase createUser or login methods.
You don’t see any FormBuilder or Validators and whatnot in the controller because we’re doing what they refer to as Template-driven forms in Angular 2.
The template:
<h2>Login</h2>
<form #formData='ngForm' (ngSubmit)="onSubmit(formData)">
    <p>
        <label> Enter email address
            <input type="text" name="email" (ngModel)="email" requred>
        </label>
    </p>
    <p>
      <label> Password
          <input type="password" name="password" (ngModel)="password" required>
      </label>
    </p>

    <button type="submit" [disabled]="!formData.valid">Submit</button>
    <a routerLink="/signup">Don't have an account?</a>
</form>
You can read more about FormBuilders and so on in my other article. Although it is about Ionic2, the parts about Angular 2 still apply.
I use (ngModel) because I want the data from the form to be one-way binding. If I’m displaying the form input right there in the template, I could simply two-way bind it, using [(ngModel)] instead.
However, if you don’t need the benefit of two-way data binding, then use (ngModel).
By simply adding the required attribute on the input element, we get a required validation for free from Angular. That is how we’re able to use [disabled]="!formData.valid" which disables the submit button until all the form fields are valid.
The app/auth/signup.component.html is similar to the above, just copy-paste and rename the file to app/auth/login.component.html.
After everything we’ve done above, we need to expose the AuthModule to our entire AppModule and make the rest of our app aware of this module.
Our app.module.ts is now looking like this:
import { NgModule }      from '@angular/core';
import { BrowserModule } from '@angular/platform-browser';
import { CommonModule } from '@angular/common';

import { AppComponent } from './app.component';

import { AngularFireModule,
  FIREBASE_PROVIDERS,
  AngularFire,
  AuthMethods,
  AuthProviders
} from 'angularfire2';

import { AuthModule } from './auth/auth.module';
import { AppRouting } from './app.routing';
import { HomeComponent } from './home/home.component';

export const firebaseConfig = {
  apiKey: "AIzaSyCEyXvyCdsIaCm57-6ZQhu1mKCoJJ4cVkI",
  authDomain: "treesmart-79461.firebaseapp.com",
  databaseURL: "https://treesmart-79461.firebaseio.com",
  storageBucket: "treesmart-79461.appspot.com",
  messagingSenderId: "1067236749004"
}

export const firebaseAuthConfig = {
  provider: AuthProviders.Password,
  method: AuthMethods.Password
}

@NgModule({
  imports:      [
    BrowserModule,
    AngularFireModule.initializeApp(firebaseConfig, firebaseAuthConfig),
    AuthModule,
    DashModule,
    AppRouting,
    CommonModule
   ],
  declarations: [
    AppComponent,
    HomeComponent,
    PageNotFoundComponent
  ],
  providers: [],
  bootstrap:    [ AppComponent ]
})
export class AppModule { }
See, we didn’t have to import our Authentication components and redeclare them in the app.module.ts. Why? Because we did the declaring in the auth.module.ts and as such, all we needed to do was just import the module, then add to the list of imports we have.
Dead simple!
If everything is working, you should be able to sign up and sign in with the forms above. If you can’t, pause here and try to fix all the errors you come across.
Auth-Guard Service and Route protecting
This part is where we put to use the Authentication we have in protecting and securing certain routes.
There’s no sense in throwing authentication into an app if ALL the pages are publicly accessible without any content restriction.
Firebase gave us the Authentication API, so we wouldn’t have to worry about spinning up our PostgreSQL or MongoDB or whatever.
I express even more joy how Firebase helps you get up and running quickly as it did for me when I was building CodeBySide
Firebase allows us to check if the current app state is authenticated or not. We do not want to do this check over and over across our app in each component, so we abstract that functionality away into a service, then we go ahead to use this service’s power in protecting specific routes.
Let’s see that in action.
UPDATE 26/09/2016:
The previous canActivate function wasn’t responsive enough and didn’t wait for the observable to resolve. New changes below fixes it.
import 'rxjs/add/operator/map';
import 'rxjs/add/operator/first';
import { Observable } from 'rxjs/Observable';

import { Injectable } from '@angular/core';
import { CanActivate, Router, ActivatedRouteSnapshot, RouterStateSnapshot } from '@angular/router';
import { AngularFire } from 'angularfire2';

@Injectable()
export class AuthGuard implements CanActivate{
  public allowed: boolean;

  constructor(private af: AngularFire, private router: Router) { }

  canActivate(route: ActivatedRouteSnapshot, state: RouterStateSnapshot): Observable<boolean> {
    return this.af.auth.map((auth) =>  {
      if(auth == null) {
        this.router.navigate(['/login']);
        return false;
      } else {
        return true;
      }
    }).first()
  }
}
BUG 5: If you’re using an ES6 linter and debugger in your code editor, the above error might come straight up as you type. In Sublime Text 3, with the Typescript plugin enabled, you’ll see the error underlined.
Learn more about Route Guards in Angular2
All that we want our AuthGuard to do is return a value of True or False. That’s all.
I did so by simply subscribing to the auth method of AngularFire (which wraps around firebase.auth), then whatever the observable resolves to at any point in time, should be attached to the auth variable which I check to see if null or not.
By fixing BUG 5, why return this.allowed is used instead of doing a return false or return true within the subscription block will be clearer.
I have a feeling you’re enjoying the bug hunting within this article. It can be annoying, but worth it, as you’ll be able to rewrite everything from the ground up even if your eyes are pulled out, fingers cut off and head detached from your body!
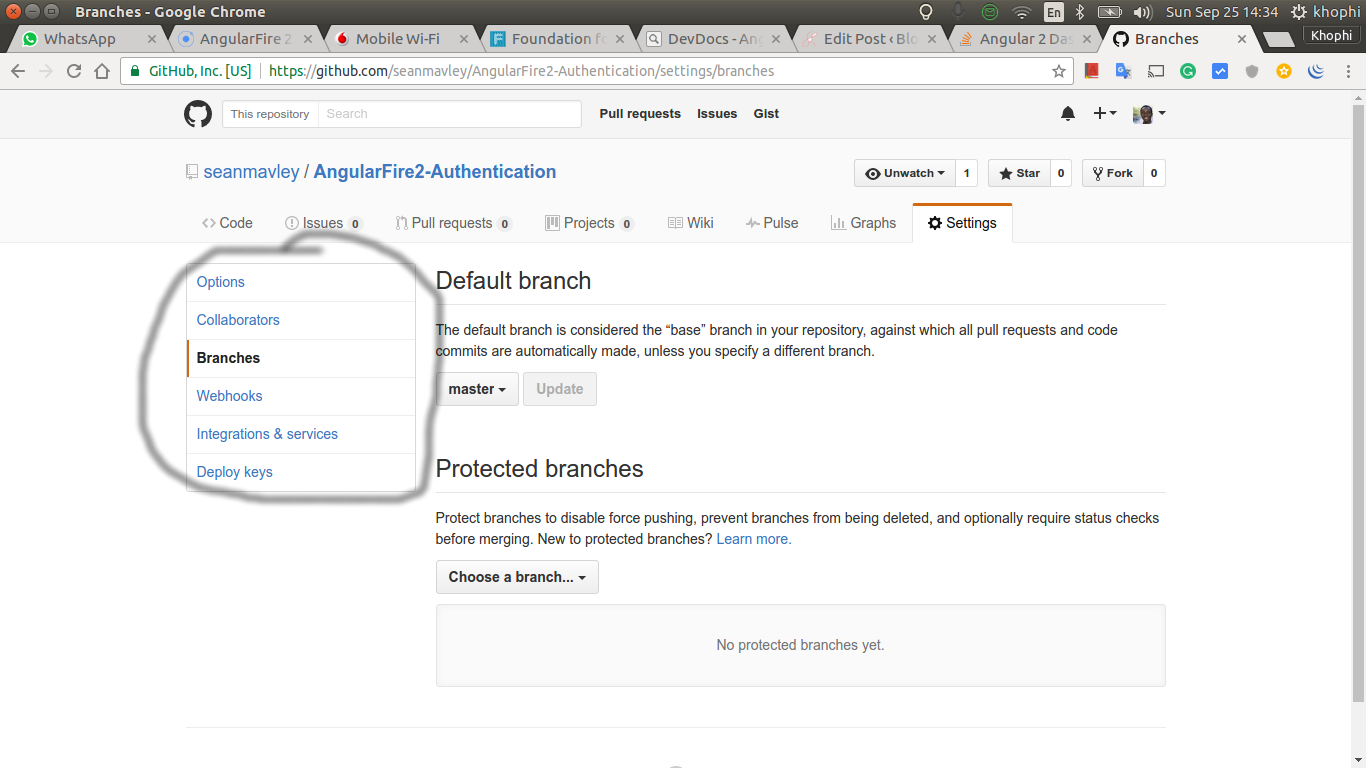
Now that we have an AuthGuard to protect our route, where do we guard? Let us create another Module, the DashboardModule which will house the Dashboard related features of our little app.
Our DashboardComponent
I will leave the making of the Dashboard Module to you. If you need help, you can check the Dashboard Folder on Github to see how I did it.
The part I only wish to draw your attention to is how the AuthGuard was used in the Dashboard Routes to protect the route to the dashboard.
import { ModuleWithProviders }  from '@angular/core';
import { Routes, RouterModule } from '@angular/router';

import { DashboardComponent } from './dashboard.component';
import { AuthGuard } from '../auth/auth-guard.service';

const appRoutes: Routes = [
  { path: 'dashboard', component: DashboardComponent, canActivate: [AuthGuard] },
];

export const dashRouting: ModuleWithProviders = RouterModule.forRoot(appRoutes);
We import the AuthGuard, then right off the bat, apply it to our route, forcing anyone who wants to see the dashboard route to log in first, otherwise, according to the AuthGuard (check the function), you’ll be redirected to the login page.
The Angular 2 Docs on Routing covers the approach you could use to save the incoming route, then route to that at the end of login, similar to one I did for Firebase Authentication with Angular 1 some time ago.
Child Routes
The first time I tried Child Routes in Angular 2 using the Final Router, I couldn’t get it to work. Today, I tried, and the process is much streamlined and easier.
The coming up of this project helped me appreciate the flow much better. I hope you do have a fair overview of Routes in Angular at this point.
At this point, we’ll introduce nested routes, known in Angular 2 as Child Routes. A chunk part of what we can do has been discussed already. This part will just be icing on the cake!
The idea
In a typical app, you might have a DashboardComponent, just like we did have above. In the DashboardComponent, you might want to have children routes, leading to say, AccountComponent, SettingsComponent, ProfileComponent, EmailsComponent and so on.
All these other components are related to the DashboardComponent and will be considered children. In this app, it was done this way:
const appRoutes: Routes = [
  { path: 'dashboard',
    component: DashboardComponent,
    canActivate: [AuthGuard],
    children: [
      { path: '', component: AccountComponent },
      { path: 'account', component: AccountComponent },
      { path: 'profile', component: ProfileComponent },
      { path: 'settings', component: SettingsComponent }
    ]
  },
];
See the entire file in the Dashboard folder:
https://github.com/seanmavley/AngularFire2-Authentication/tree/master/app/dashboard
One advantage of using Child Routes is the opportunity you now get in order to apply Route Guards to a bunch of routes at once.
In the example above, we have applied the canActivate: [AuthGuard] route guard to the parent component, DashboardComponent.
However, the effects and restrictions of the DashboardComponent will cascade down to affect all the child routes. This is a nifty way of writing less to achieve more.
So the sidemenu could simply be Child Routes of the */settings/ Component. I do not know if the above page uses Angular, however such instances, using Nested Routes can be awesome.
The parent Component, here the DashboardComponet’s template, the app/dashboard/dashboard.component.html will have to include the <router-outlet></router-outlet> tag to ensure the children routes are injected accordingly when the DashboardComponent is called.
<div class="small-12 columns">
     <router-outlet></router-outlet>
</div>
According to the official Angular 2 docs on Routing:
“The RouterModule.forRoot should only be provided for the
AppModule. Since we are in a feature module, we’ll use RouterModule.forChild method to only register additional routes.”
So in exporting our appRoutes above, we would use:
export const dashRouting: ModuleWithProviders = RouterModule.forChild(appRoutes);
It worked normal though and didn’t throw any errors when I used RouterModule.forRoot(..).
Conclusion of AngularFire2 Authentication
This is one of the blog posts I’ve written with joy and excitement. At first, it seemed daunting, however coming to appreciate how each part fits together makes me love Angular2 more.
Of course, this article will probably expire within the next 6 months, as maybe everything discussed above will be deprecated and new functions replaced, until then, I hope you enjoy it.
The above article snippets along with every piece that makes up what you saw in the video in the introduction can be found in the AngularFire2 Authentication repository on Github. Give it a star if you like it, and if there’s any improvement you think the app could make, please send in your PR.
Leave your comments in the sections below, and I’ll be ready to answer them. If you know a friend who’ll appreciate the getting started to AngularFire2 Authentication, please do share this article.
Thanks for joining me, and hope to see you in the next one.
Solutions:
BUG 1: Change <my-app>loading...</my-app> to <root-app>loading...</root-app> . This might be one annoying bug to trace, but it is important to double check.
BUG 2: You should have this instead in your systemjs.config.js file. More details available in this this StackOverflow discussion.
      angularfire2: {
        main: 'bundles/angularFire2.umd.js',
        defautExtension: 'js'
      },
BUG 3: You should have this instead:
<nav>
<a routerLink="/">Home</a>
<span> •
<a>Dashboard</a> •
<a>Logout</a>
</span>
<!-- the </span> above was missing -->
<span> |
<a>Login</a> •
<a>Sign up</a>
</span>
</nav>
<hr>
<p>
<router-outlet></router-outlet>
</p>
BUG 4: The import missing is this:
import { CommonModule } from '@angular/common';
Read more about the CommonModule
BUG 5: On this line in the snippet, you need to add : boolean to it before the opening curly brackets, like so:
canActivate(route: ActivatedRouteSnapshot, state: RouterStateSnapshot): boolean {
so that the complete canActivate function will be like this:
  canActivate(route: ActivatedRouteSnapshot, state: RouterStateSnapshot): boolean {
    this.af.auth.subscribe((auth) =>  {
      if(auth == null) {
        this.router.navigate(['/login']);
        this.allowed = false;
      } else {
        this.allowed = true;
      }
    })
    return this.allowed;
  }
Congratulations!